Import Lines Into A Transaction
This article explains how to import line items into a transaction from a spreadsheet, including standard lines, model options, and build components. This feature is available within the Detail Window for Quotes, Orders, Invoices, Job Transfers, Request for Quotes, Purchase Orders, and Purchase Invoices. For an alternate option, see the article on Importing a List of Orders.
Import File
Transaction detail lines can imported by clicking on the “Import File” button in the header on a transaction.

From here, choose the file and the settings for the import.
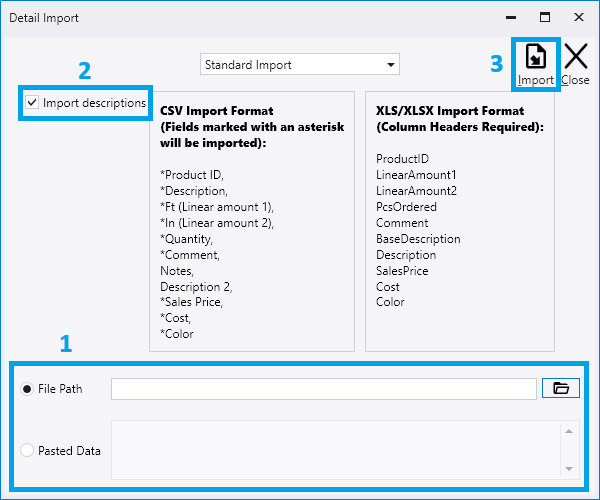
- Choose the file by clicking the folder icon, or paste date in the field below. The import file used must be saved as a CSV, XLS, or XLSX. The default file path will be the file that the user last imported.
- Import Descriptions – Select this to import the descriptions. If left unchecked, it will use the descriptions from Paradigm. Descriptions for bundles will always be imported, but if the description is blank in the file, the description from Paradigm will be used.
- Once the file is ready to import, click the “Import” button.
Standard Import Format (Fields Marked with an Asterisk will be Imported)
The headers (header names in parentheses) are only required for the columns on an XLSX import. The columns can be in any order.
- *Product ID (ProductID)
- *Description (BaseDescription)
- *Ft (LinearAmount1)
- *In (LinearAmount2)
- *Quantity (PcsOrdered)
- *Comment (Comment)
- Notes (Notes)
- Description 2 (Description)
- *Sales Price (SalesPrice)
- *Cost (Cost)
- *Color (Color)
All the columns after comment are optional, so the file data can be stopped at any column after that.
XLS Example

XLSX Example

CSV Example
WSH3644,window,”3’x3′ 8″””,0,1,opening
FJBZ,F&J,”10′ 2″”x0′ 2″””,0,25,Connect Soffit to Wall ( F&J Exterior)
AWH,panel,20,10,2,siding
AWH,panel,22,10,4,siding
Standard With Build Import Format
This import option can be used to import order detail lines (rows with a LineType of “H”) with the build component information in the same file (rows with a LineType of “D”). This would be used in a case where an order needs to be created with some standard items (like lumber, screws, panels, etc.) as well as some custom-assembly items (like trusses) and all of the detail of these items can be placed into a single file to import.
- Choose the import mode “Standard With Build Import”
- Choose the file by clicking the folder icon.
- The import file used must be saved as XLS or XLSX.
- The default file path will be the file that the user last imported.
- Once the file is ready to import, click the “Import” button.
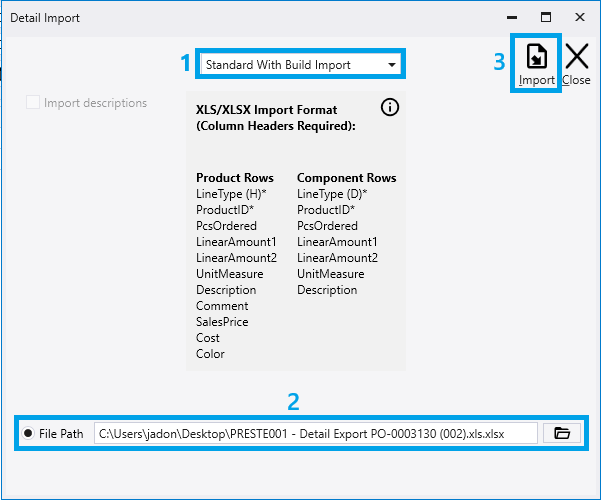
Standard With Build Import Fields (Column Headers Required)
Column headers are required and fields Marked with an asterisk are required for the import as well.
- Product Rows
- LineType (H)*
- ProductID*
- PcsOrdered
- LinearAmount1
- LinearAmount2
- UnitMeasure
- Description
- Comment
- SalesPrice
- Cost
- Color
- Component Rows
- LineType (D)*
- ProductID*
- PcsOrdered
- LinearAmount1
- LinearAmount2
- UnitMeasure
- Description
XLS/XLSX Example

Item Import Errors
Invalid Discontinued Items
If an item with an invalid product ID or a discontinued item is imported, it will appear on the transactions as a comment line.

Under Minimum Length Item
If an item is imported with a length under the minimum, it will appear on the transaction as a comment.

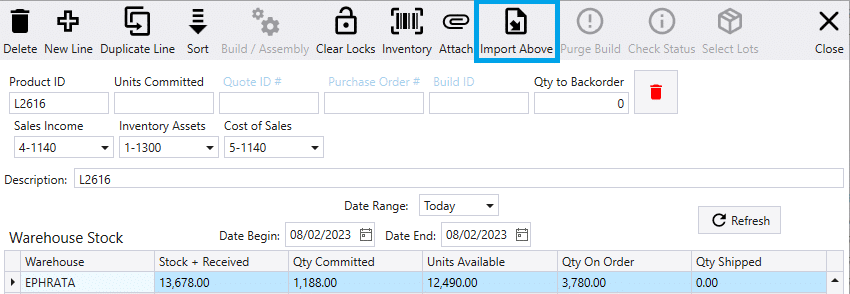
Import Above
If the transaction lines getting imported are to be at a certain place on the transaction, click the folder icon on the item they need to go above, and select “Import Above”.

Import Model Options
To select model options when importing, add the model option to the description in the following format: {OptionName:OptionValue}
In the example below, the item has a model option called “COLOR” and the option value is getting set to “RED”.


More information on model options can be found here: Model Options