
Maintenance Tracking Addon
The maintenance tracking add on can be used to keep track of equipment, repairs, tasks and inspections. It can be used to report when equipment needs to be repaired or replaced, store user manuals and other equipment-related documents, schedule repairs or preventative maintenance based on calendar days or usage, and track part numbers used to complete a repair. It is used by shop and yard staff who log equipment use, work repair orders and fill in inspections, and by office staff and administrators who set up schedules, types and inspection templates.
How Equipment, Repairs, Tasks and Inspections Fit Together
Equipment and Maintenance keeps track of trucks, forklifts, rentals and other equipment, and of the work done on them. It answers three everyday questions: what needs doing, what is overdue, and what has been done.
- Equipment – Each machine that is looked after, with its details, attachments and custom fields.
- Logs – Readings and events for a piece of equipment, such as hours, miles or a service.
- Repair Schedules – These create repair orders automatically: every so many hours or miles (from the logs), every so many days, or whichever comes first.
- Repair Orders – The jobs to do. Each one has a due date, a repair type, and the person assigned to it.
- Tasks – The to-do items behind repair orders and other work, assigned to a person.
- Inspections – Checklists, for example a daily forklift check. A failed check can create a repair order by itself.
Tip: Every screen follows the same layout: the title and the record being viewed at the top, the actions under it, then the details. The one blue (filled) button is always the main action of the screen.
Opening the App and Signing In
- In the Paradigm Portal, open the Equipment menu and choose Equipment Overview, Tasks or Inspections.
- If the user is not signed in, the screen will only show “Log in to use equipment and maintenance.” and a Log in button. Click Log in, sign in with the portal user name and password, and it will return to the screen that was opened.
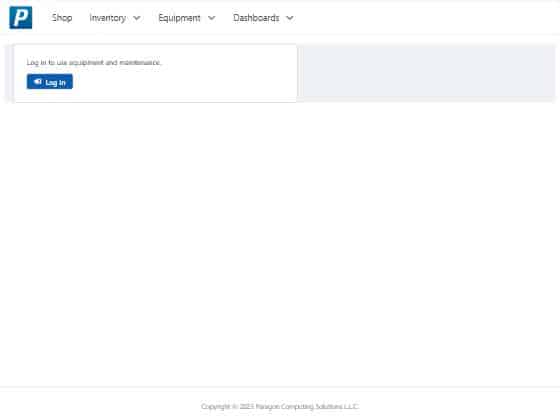
The portal login must be linked to a Paradigm user. If it is not, a message will say so and an administrator will need to link it.
Note: The Inspections screens can be used on a yard tablet without signing in to the portal. The start form will ask who is doing the inspection. Log in is offered at the top right if it is wanted.
Equipment and Maintenance Menu
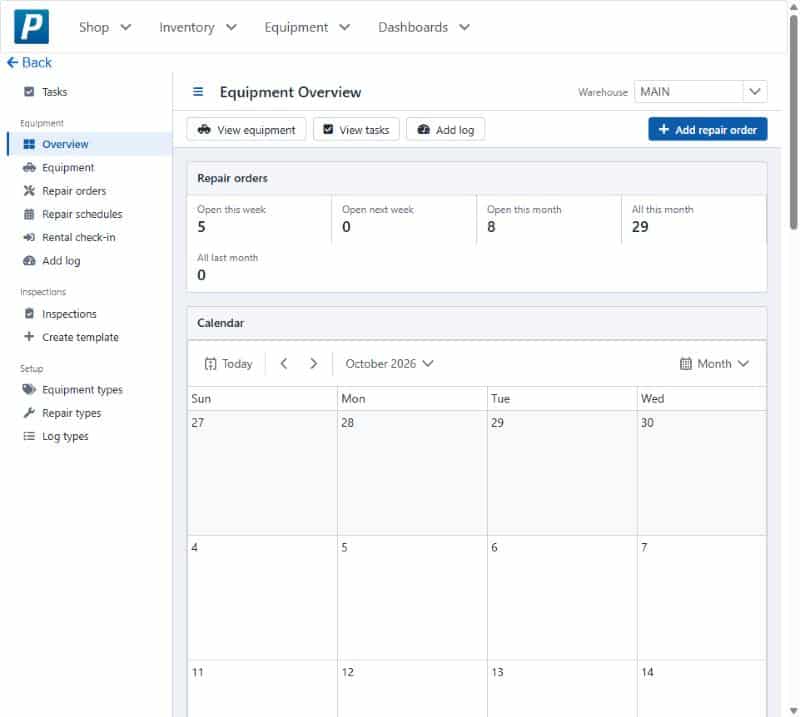
The menu is grouped by what is being done. The page being viewed is highlighted, including detail and edit pages (an equipment’s details page highlights Equipment).
- Tasks – The to-do list.
- Equipment – Overview, Equipment, Repair orders, Repair schedules, Rental check-in and Add log.
- Inspections – The inspection list, and Create template (administrators only).
- Setup – Equipment types, Repair types and Log types.
Click the ≡ button beside the title to hide the menu and give the screen more room, and click it again to bring the menu back.
Filtering by Warehouse
Screens that list equipment or repair orders have a Warehouse box at the top right. Choose a warehouse to see only its equipment, or [ALL] to see every warehouse. The choice is remembered on the device and used on every screen that has the filter.
Searching and Sorting Lists
- Type in Enter text to search… to narrow a list.
- Click on a column heading to sort by it. The arrow shows the sort order.
- Blue names are links. Click on one (or press Tab to reach it and Enter to open it) to open that record.
- Use the page numbers and Page size at the bottom of long lists.
Equipment Overview
The Overview is the place to start the day. From top to bottom it shows the repair order counts, a calendar, the open repair orders due soon, and the lists of past due and unassigned repair orders.
Repair Order Counts
| Count | What it counts |
|---|---|
| Open this week | Repair orders due this week that are not completed |
| Open next week | Repair orders due next week that are not completed |
| Open this month | Repair orders due this month that are not completed |
| All this month | Every repair order due this month, completed or not |
| All last month | Every repair order that was due last month |
Repair Order Calendar
The calendar shows open repair orders on their due dates, by equipment name. Use Today and the arrows to move between months, and Month to switch to a week or day view. Click on a repair order on the calendar to open it.
Open Repair Orders Due Soon
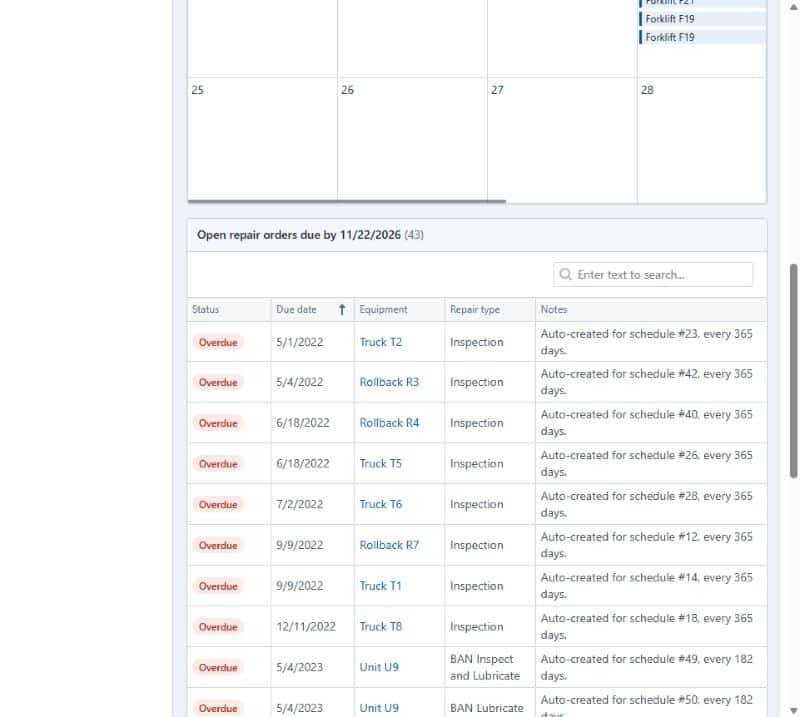
This list shows every repair order that is not completed and is due within the next 30 days, including overdue ones. Each row has a status word (see Status Words below). Click on a row, or its equipment name, to open the repair order.
Past Due and Unassigned Repair Orders
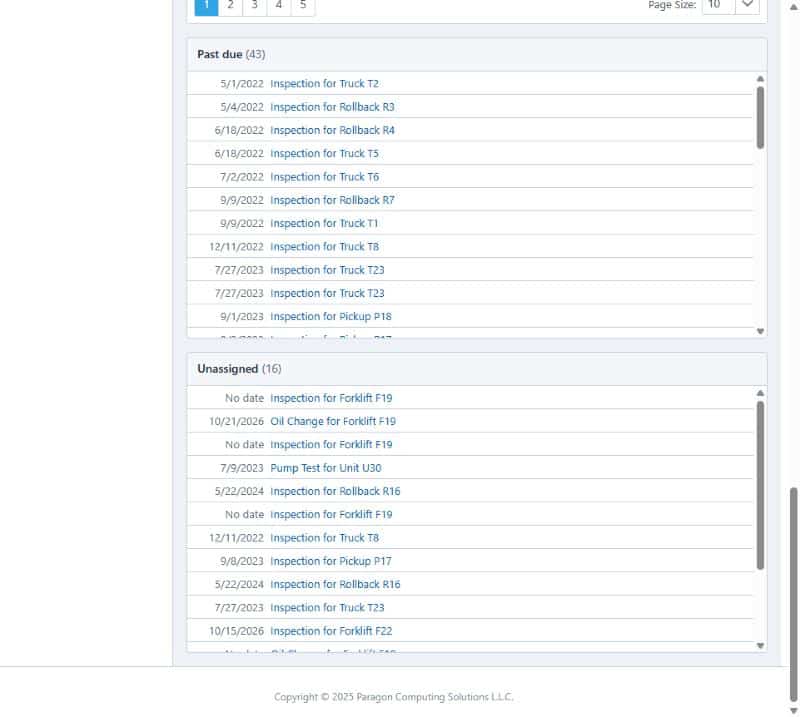
- Past due – Lists repair orders that are not completed and were due before today.
- Unassigned – Lists open repair orders with nobody assigned. Open one and click Edit repair order to assign it.
The toolbar has shortcuts to View equipment, View tasks and Add log, and Add repair order as the main action.
Viewing and Completing Tasks
This is a list of the tasks assigned to the user that is signed in. These tasks are generated by repair orders, or manually added.
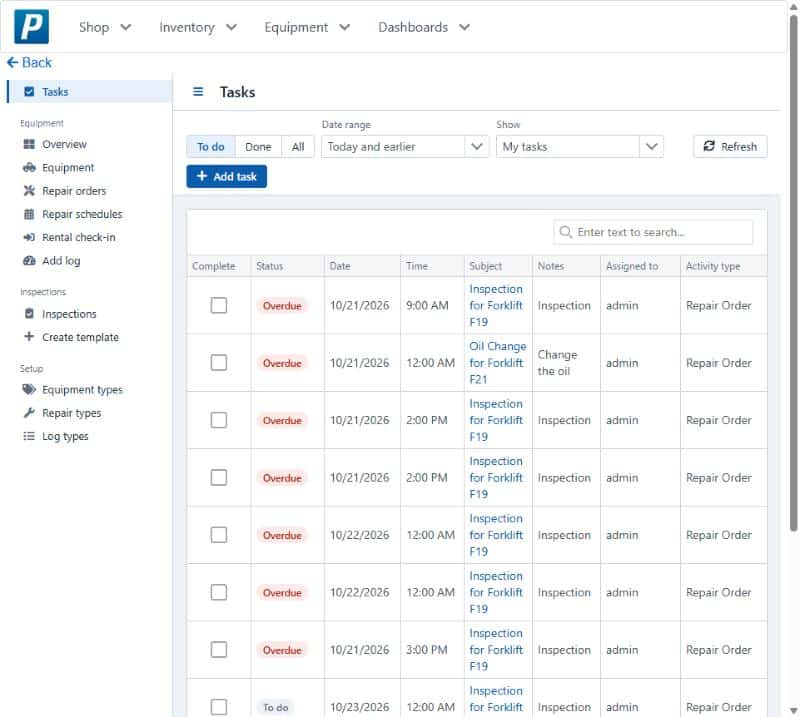
Filtering the Task List
- To do / Done / All – Chooses which tasks to show.
- Date range – Limits the list by the task date. Choose Custom range to enter a From and To date.
- Show – Chooses My tasks (assigned to the user), Created by me, or All (either).
- Refresh – Reloads the list, for example after someone else assigns a task.
Each task has a status: Overdue (red) when its date has passed, To do when it is still ahead, and Done (green) when it is completed.
Completing a Task
Check the box in the Complete column, or open the task and click Complete task. Uncheck it (or click Reopen task) to undo.
Note: A task for a repair order that needs an inspection cannot be completed from the task list. The message says “This task requires … Complete it from its repair order.” Open the repair order and do the inspection there.
Viewing Task Details
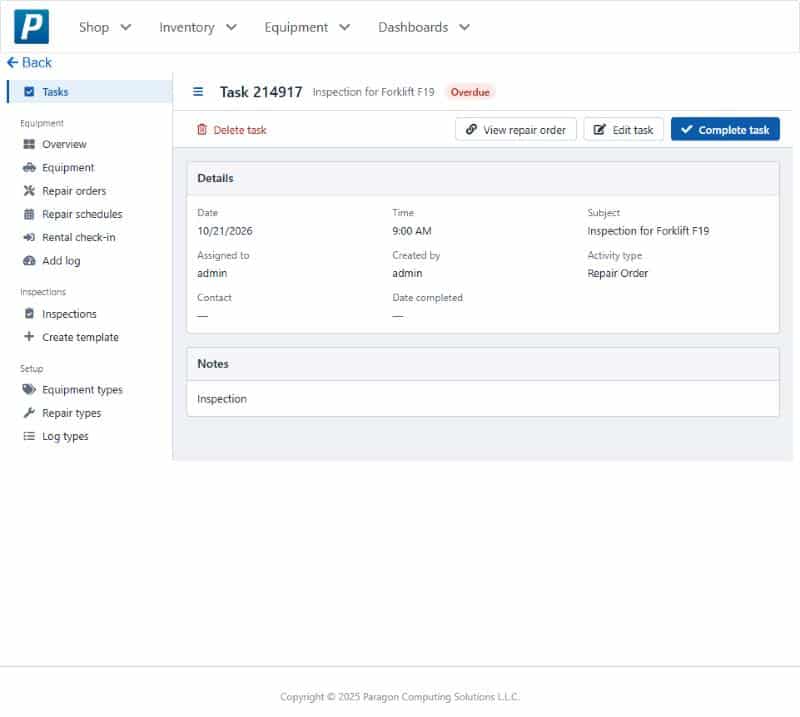
Click on a task’s subject to open it. From here the repair order can be opened, and the task can be edited (Edit task), completed (Complete task or Reopen task) or deleted (Delete task). Deleting asks first, with Cancel as the default.
Adding a Task
Click Add task on the task list. Fill in the date, time, subject, assignee, activity type and any notes, then click Save task.
Managing Equipment
Viewing the Equipment List
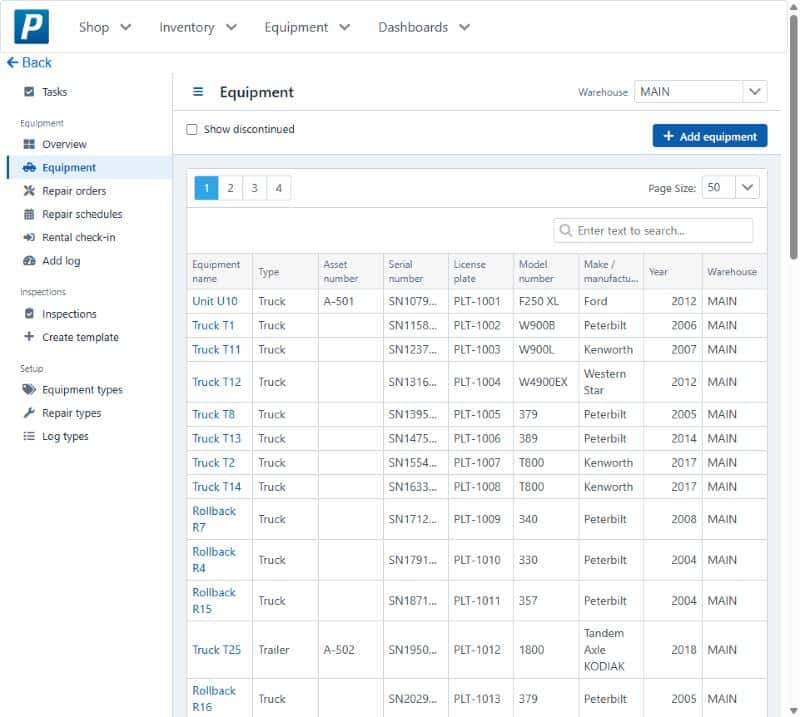
This is a list of the equipment in the selected warehouse. Check Show discontinued to include equipment that is no longer in use (marked Discontinued). Click on a name to open its details, or click Add equipment to add a new one.
Equipment Details Page
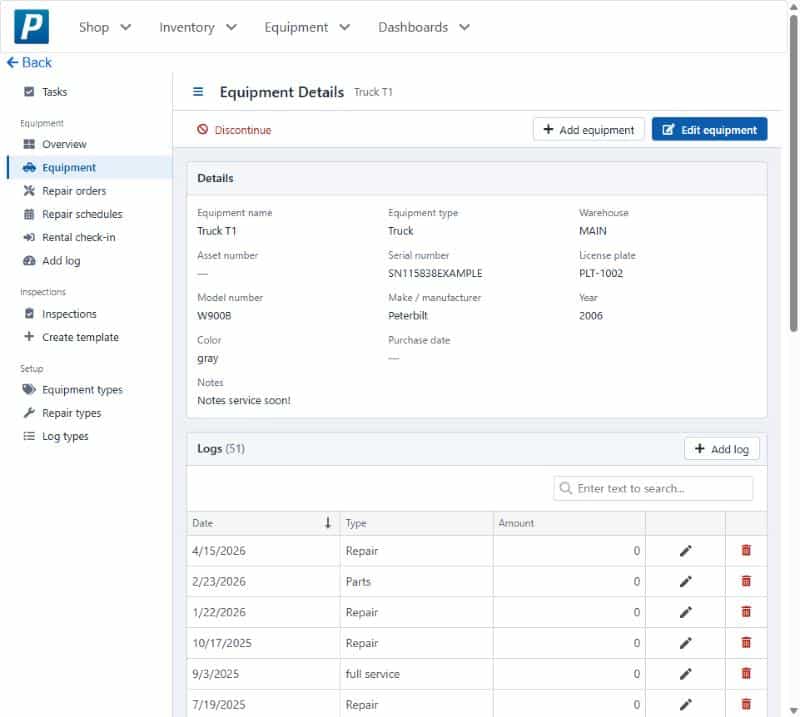
The details page brings everything about one machine together.
- Details – Name, type, warehouse, asset and serial numbers, licence plate, model, make, year, colour, purchase date and notes.
- Logs – Readings and events, newest first. Add log adds one, the pencil edits a log, and the red bin deletes one.
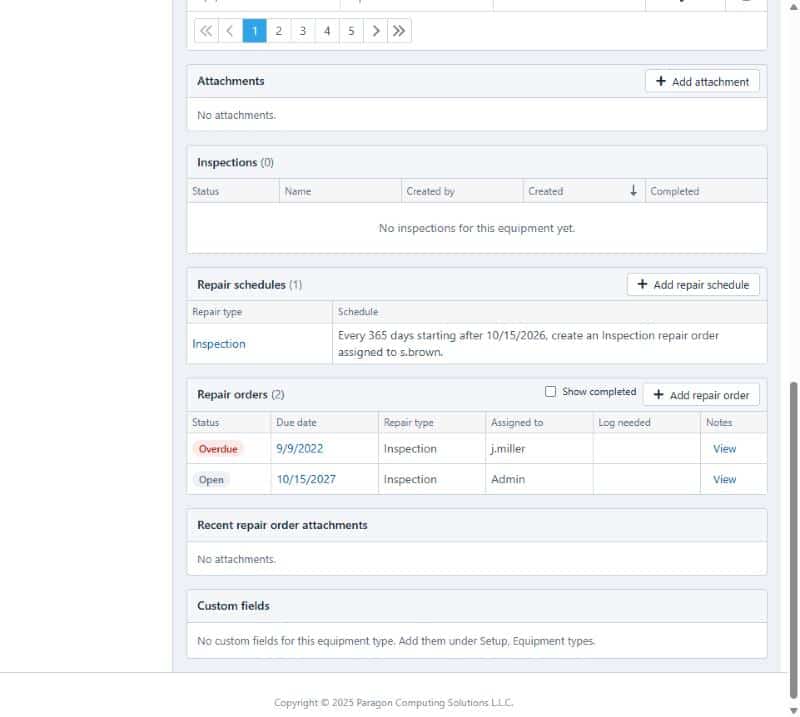
- Attachments – Files for the equipment, such as manuals and photos. Add attachment uploads one.
- Inspections – The inspections done on this equipment.
- Repair Schedules and Repair Orders – The schedules and repair orders for this equipment, with buttons to add each. Check Show completed to include completed repair orders.
- Recent Repair Order Attachments and Custom Fields – The recent files attached to repair orders, and the fields set up for this equipment type.
Deleting a Log
When a log is deleted, the app asks what to do with any repair orders that log may have created (a log can reach a schedule’s interval and create one). Choose Delete log and its repair orders, Delete log only, or Keep log to change nothing.
Adding or Editing Equipment
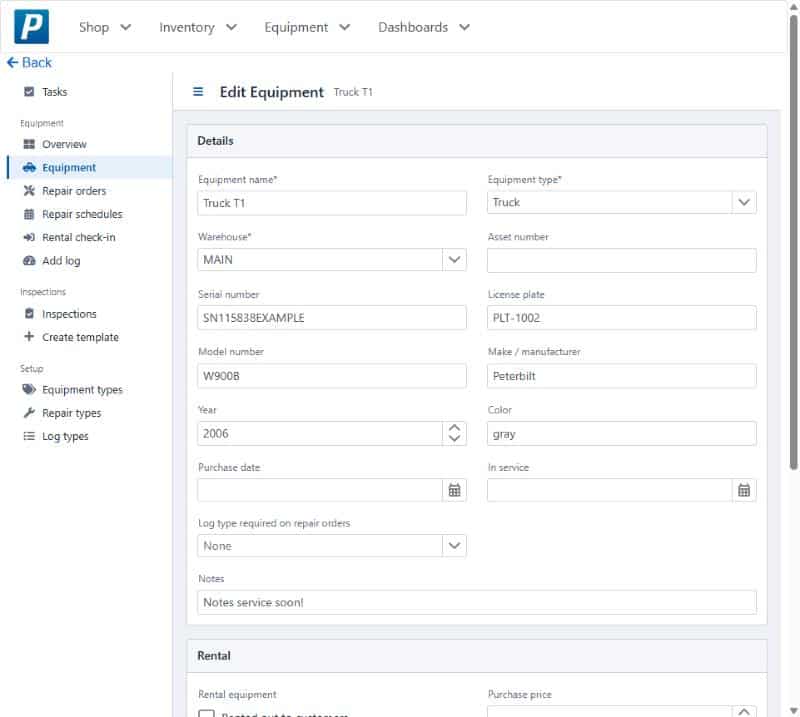
- Click Add equipment (or Edit equipment on a details page).
- Fill in the fields. Equipment name, Equipment type and Warehouse are required (marked *).
- If the equipment is a rental, check Rented out to customers and choose the rental product. Check-in questions and accessories can be added once it is saved.
- Click Save equipment at the end of the form. If anything is missing, the message appears beside the field and in a summary at the top.
Adding a Log
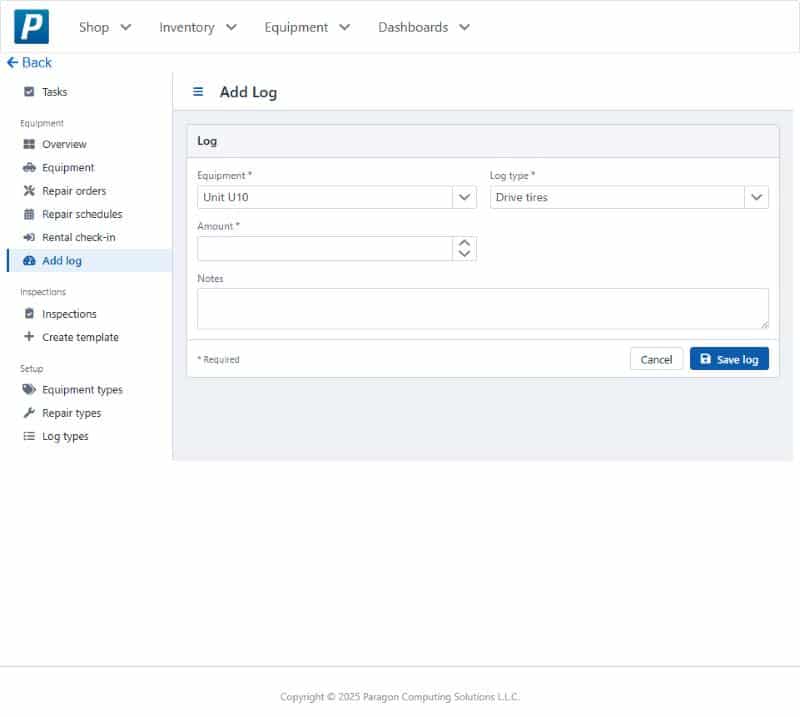
Click Add log in the menu (or on an equipment’s details page) to record a reading. Choose the equipment and log type, enter the amount, add notes if needed, and click Save log. If the reading reaches a repair schedule’s interval, a repair order is created automatically.
Discontinuing Equipment
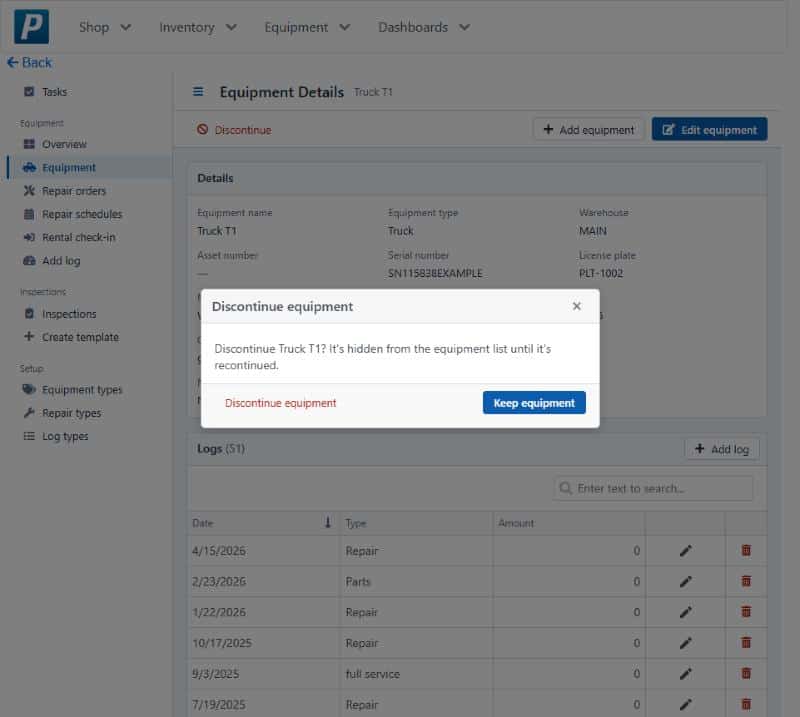
Click Discontinue on the details page when a machine is no longer used. The app asks first and names the equipment, with Keep equipment as the default. Discontinued equipment is hidden from the equipment list until Show discontinued is checked, and it can be brought back with Recontinue.
Managing Repair Orders
This is a list of repair orders in the date range for the selected warehouse.
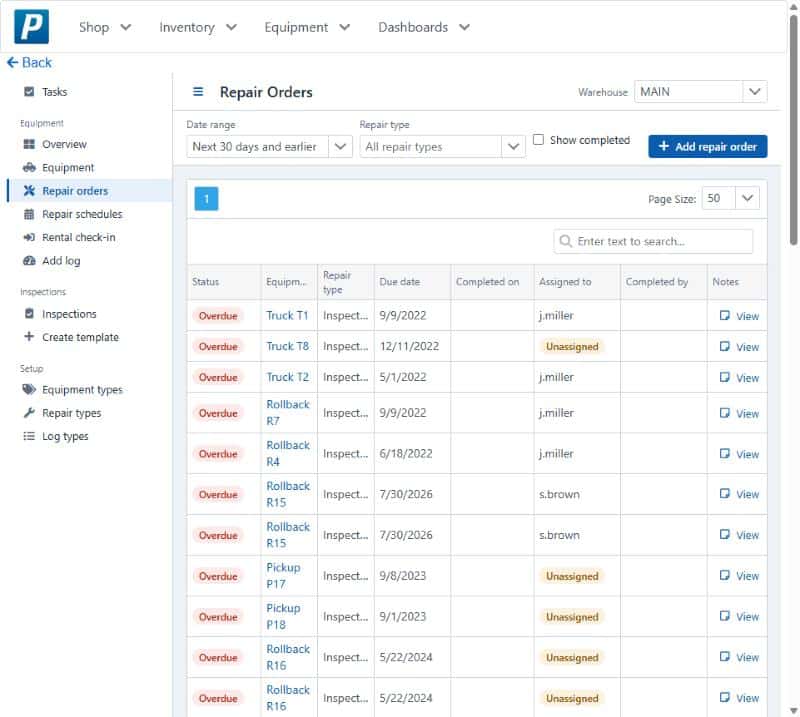
Filtering Repair Orders
- Date range – Filters by due date. The default, Next 30 days and earlier, shows everything due up to 30 days from today.
- Repair type – Shows only one type of repair. Clear it to see all types.
- Show completed – Check this to include completed repair orders.
- Assigned to – Shows Unassigned in amber when nobody is assigned yet.
- Notes – Click View in the Notes column to read a repair order’s notes without opening it.
Repair Order Details
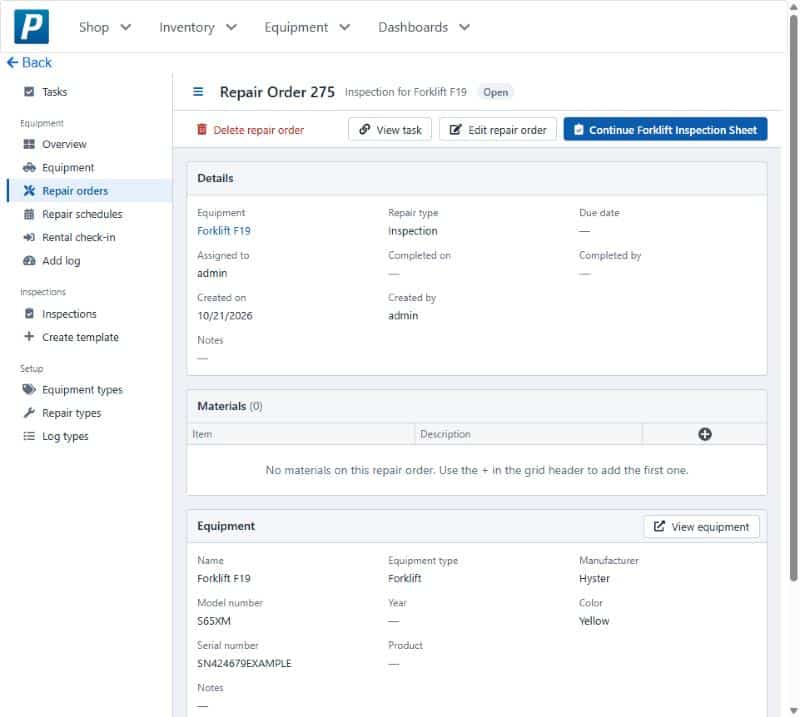
The main action at the top right depends on the repair order.
- Complete repair order – Shown when no inspection is needed.
- Start … or Continue … – Shown when the repair type needs an inspection. The repair order is completed when the inspection is.
- Reopen repair order – Shown once it is completed.
If the equipment needs a reading (for example hours) to complete a repair order, a dialog titled “Enter a reading to complete” asks for the current reading. It is saved as a log and the repair order is completed.
To store the materials and parts used for a repair, find the repair on the list and click on it to open the repair order details. Then click the + in the Materials grid header and enter in the item’s information. Edit repair order changes the due date, assignee or notes. Delete repair order asks first and names the repair order, with Keep repair order as the default.
Note: A repair order that a repair schedule created cannot be deleted while the schedule exists. Delete that repair schedule first.
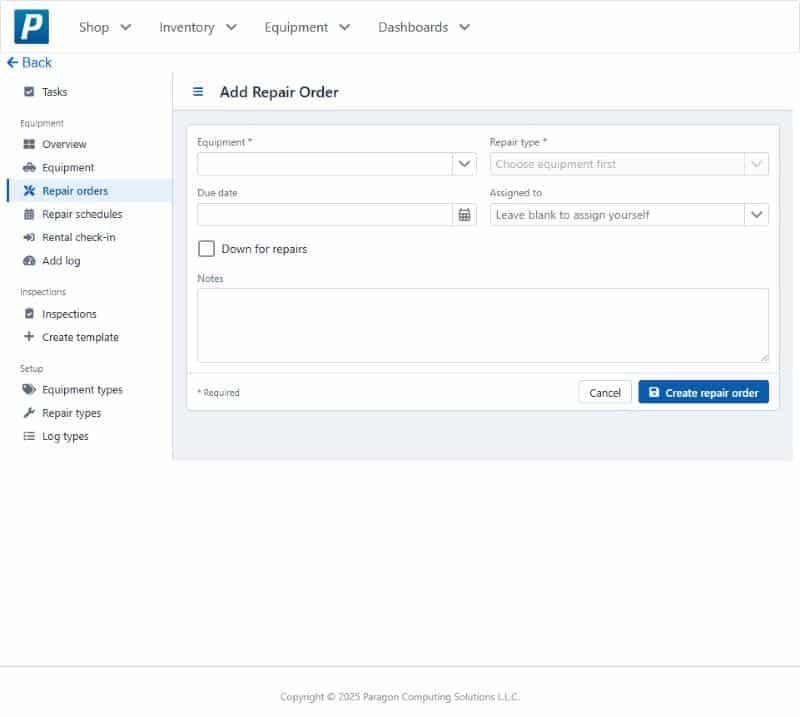
Adding a Repair Order
Usually repair orders are generated automatically by the repair schedule, but repair orders can be manually created.
- Click Add repair order (on the Overview, the Repair orders list, or an equipment’s details).
- Choose the Equipment. The Repair type list will then show the types for that equipment.
- Enter the Due date and choose a user in the Assigned to field (leaving it blank assigns the repair order to the current user). Check Down for repairs if the machine is out of service.
- Click Create repair order.
Scheduling Repairs by Hours, Miles or Days
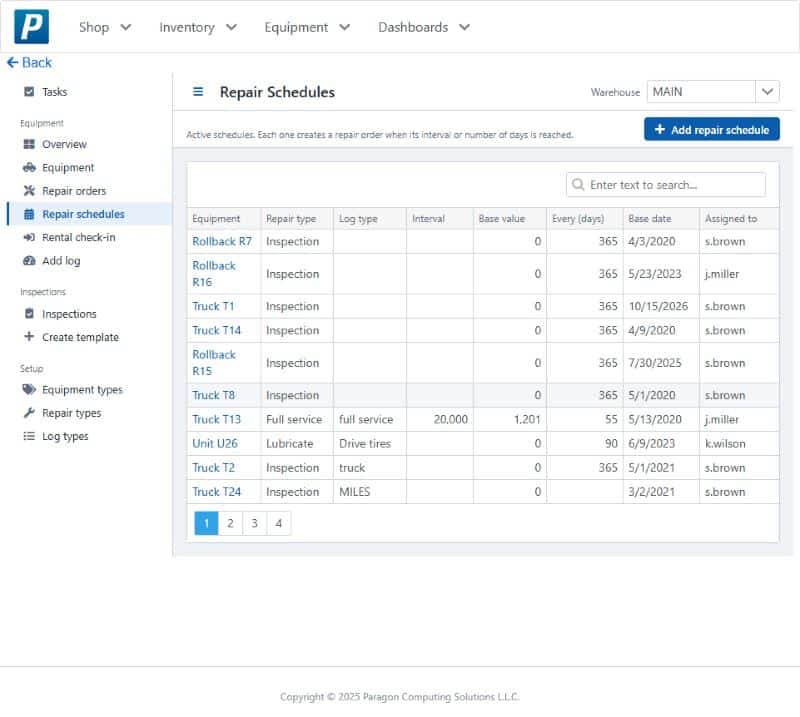
A repair schedule creates repair orders automatically. Each one watches a piece of equipment and creates a repair order of its repair type when its interval or number of days is reached.
- Interval and Base value – By reading. For example every
250hours, counting from a reading of1,200. - Every (days) and Base date – By time. For example every
90days, counting from 1 March. - When a schedule has both, whichever comes first creates the repair order, and then both start counting again.
Adding a Repair Schedule
- Click Add repair schedule (on this list or an equipment’s details).
- Choose the Equipment and the Repair type.
- Check Create by interval to create by readings, and fill in the log type, interval and base value. Check Create by days to create by time, and fill in the days and base date. Both can be checked.
- Choose the user who receives the repair orders in the Assigned to field, or leave it blank to assign them to the current user.
- Check What this schedule does, which describes the schedule in a sentence. Then click Create repair schedule.
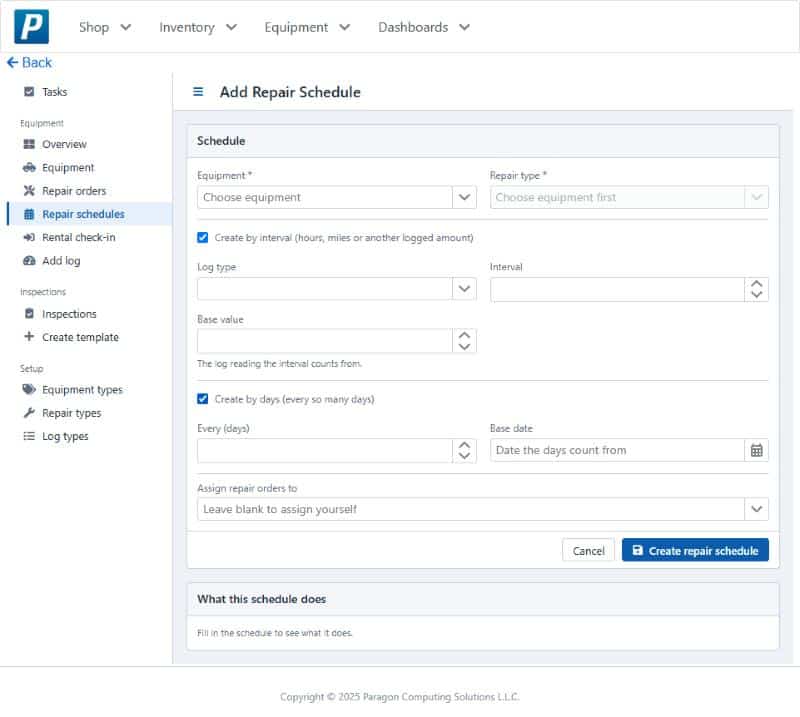
To change or delete a schedule, click on its equipment name in the list.
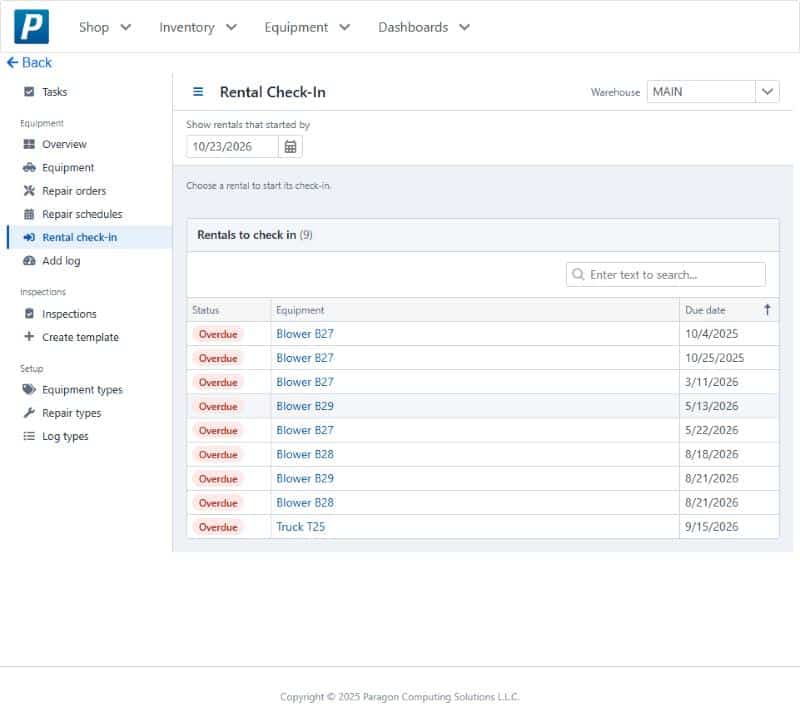
Rental Check-In
Rental check-in lists rental equipment that is out and not yet checked in. Show rentals that started by limits the list to rentals that began on or before a date.
- Click on the equipment name of the rental that is being checked in.
- Answer the check-in questions. Required questions are marked *.
- Click Add log to record a reading (for example hours) as it comes back, or Add repair order if something needs fixing.
- Click Check in. It becomes available once every required question is answered.
Equipment Inspections
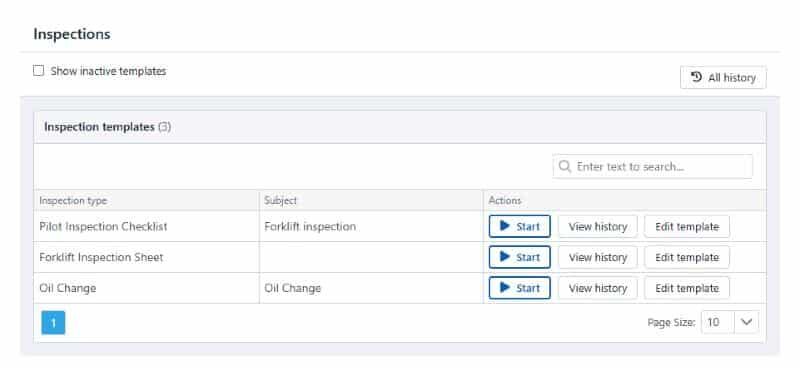
The inspections list will display the available inspection templates and allows the user to start an inspection for a piece of equipment. Check Show inactive templates to include ones that are switched off. All history shows every inspection done.
Starting an Inspection
- Click Start beside the template.
- Choose who is doing the inspection (User) and the Equipment. The equipment list shows active equipment of the template’s type in the selected warehouse.
- If the template records a reading, enter the Log amount.
- Click Start inspection.
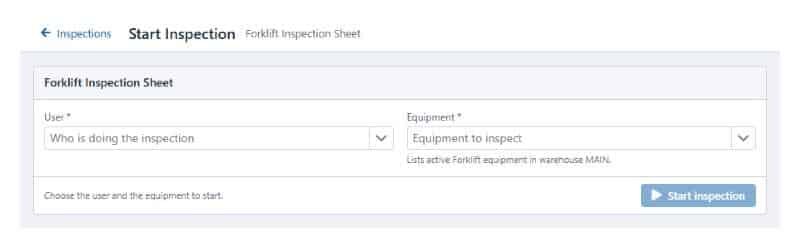
Answering Inspection Checks
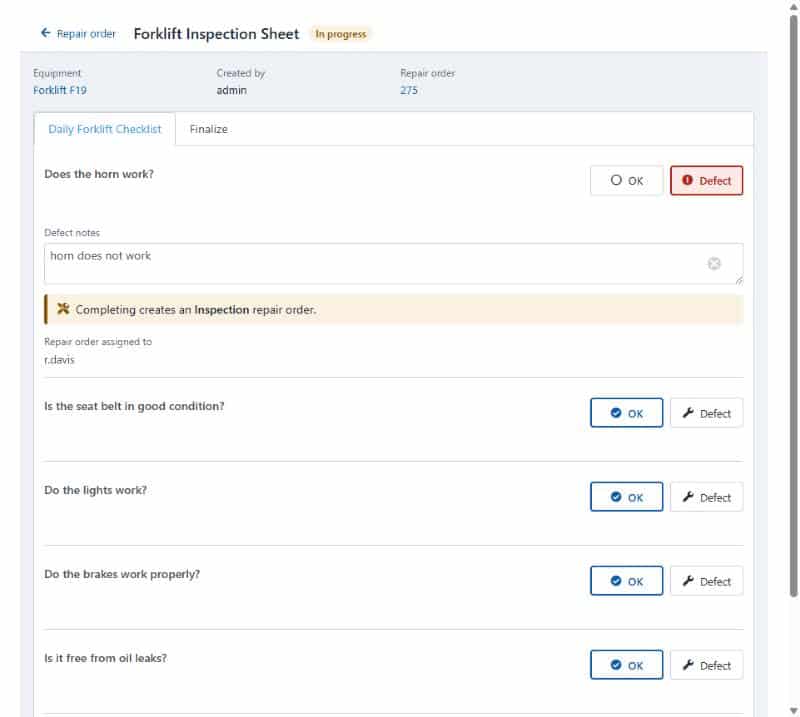
The checks are grouped into tabs. For each check, tap OK or Defect. A check that has not been answered yet says Not answered.
- Tapping the answer that is already selected does nothing, so a double tap cannot undo an answer.
- For a Defect, describe what is wrong in Defect notes. If the check is set up to create a repair order, the message says which repair order will be created and which user will receive it (or lets the user choose).
- Mark the rest OK and continue – Answers every unanswered check in the group as OK and moves to the next group.
- Next – Moves on once every check in the group is answered. The line beside it says what is still needed.
Completing an Inspection
On the Finalize tab, enter the log amount if the template asks for one, and any Additional notes. Then click Complete inspection (or Complete repair order when the inspection belongs to one). Defects set up to create repair orders create them now, and notes are added to the repair order’s notes.
A completed inspection shows each answer as OK or Defect and the notes as text. It cannot be changed.
Inspection History
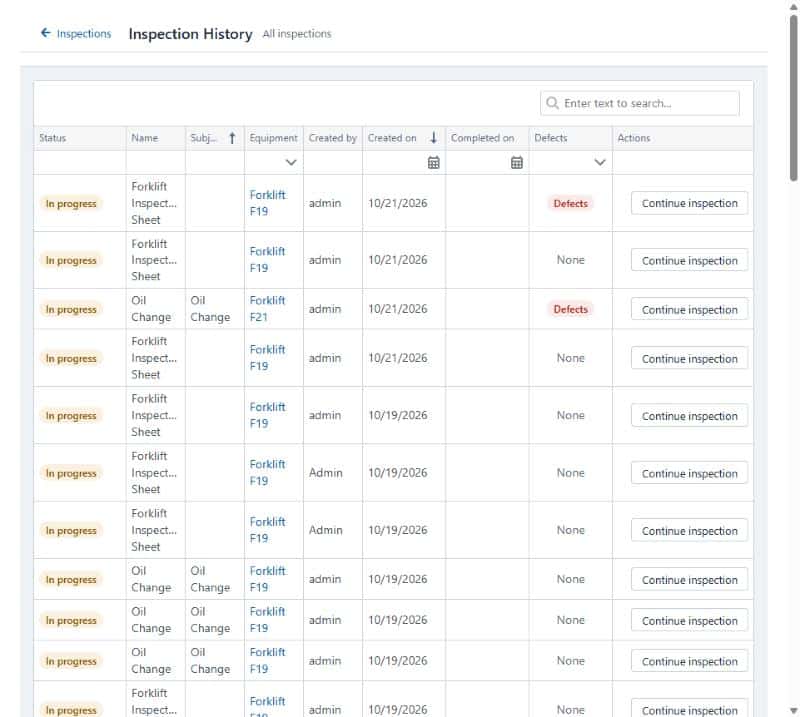
History lists past inspections, newest first, with In progress or Completed and whether any check found Defects. Use the filter row under the headings to narrow it. Continue inspection opens one that is not finished, and View inspection opens a completed one.
Creating Inspection Templates (Administrators)
The Inspection Wizard Designer can be used to create an inspection checklist. Inspection groups can be created with multiple checks in each group.
- Click Create template in the menu, or Edit template beside a template.
- Enter the Name and Equipment type. Choose a Log type if the inspection should record a reading. Check Active so it can be started.
- Click Add group for each tab of checks, and name it. Group order sets the order of the tabs.
- Click Add check for each question. Give it a name and Check order. Optionally check Create a repair order when this check has a defect and choose the repair type and, optionally, the user that receives it.
- Click Save and exit (or Create template) at the end of the page.
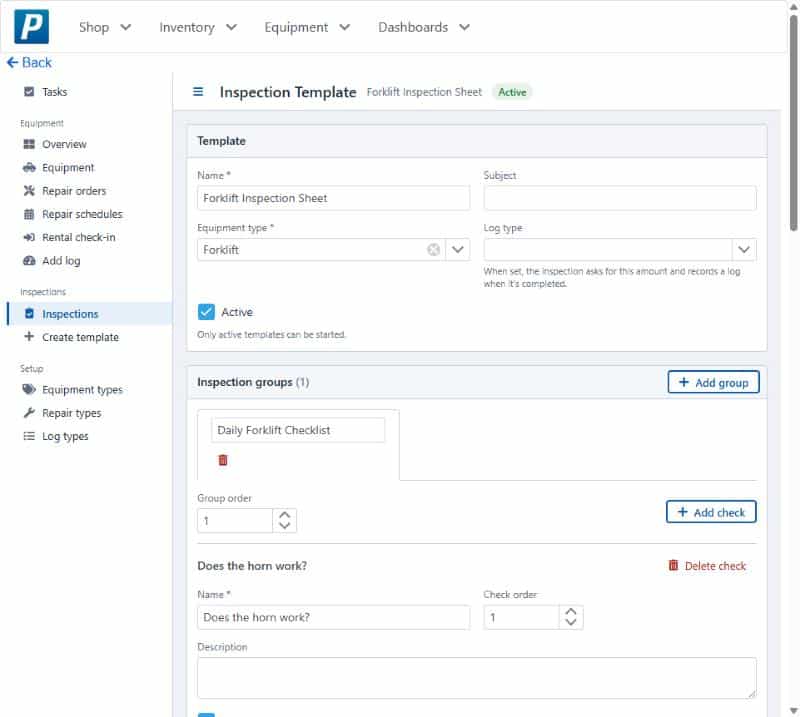
Note: Checks are saved as they are edited. Cancel leaves without saving the template’s own fields (name, type, groups), but changes to checks are already saved.
Equipment, Repair and Log Types
The Setup screens hold the lists the rest of the app uses. In each one, click Add … at the top right to add a row, the pencil to edit a row, and the red bin to delete one (it asks first).
Equipment Types
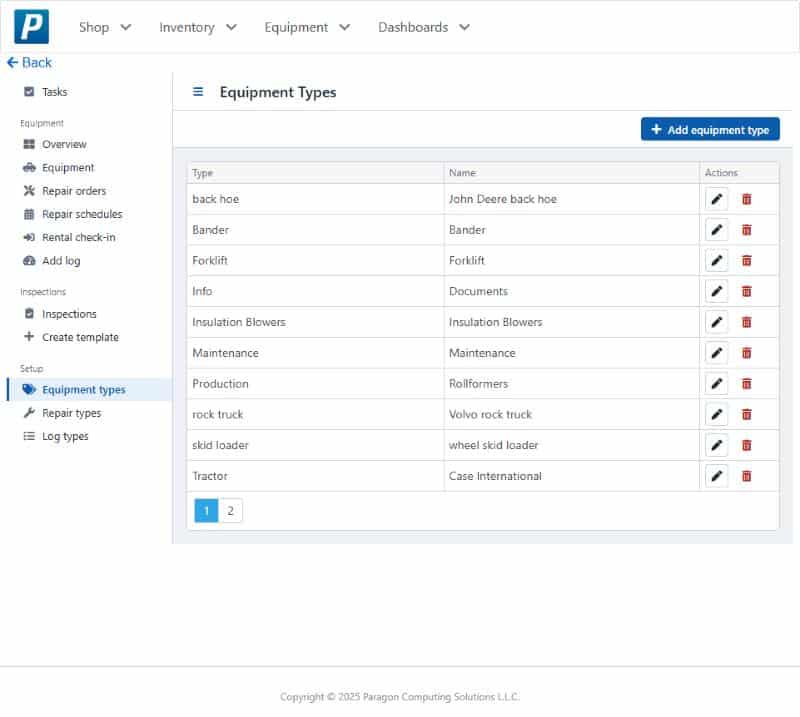
This is a list of equipment types, which are used when adding a piece of equipment to the equipment list. Each equipment type can have custom fields: extra details recorded for every machine of that type (for example tire size). Add them while editing the type, with the + button in the custom fields grid.
Repair Types
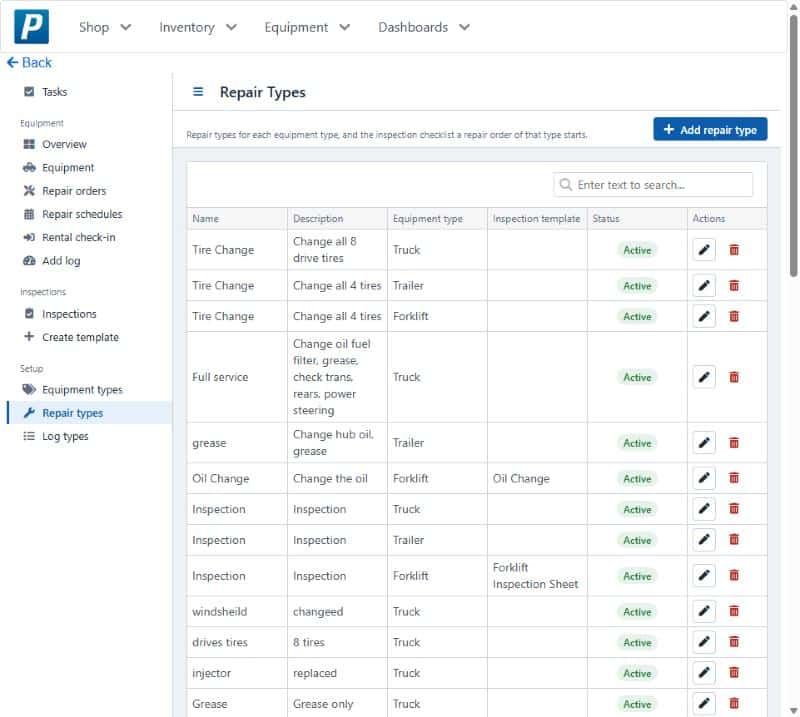
This is a list of repair types, which are used when creating a repair schedule or a repair order. A repair type belongs to an equipment type. Choose an Inspection template if repair orders of this type need an inspection to complete. Active or Discontinued shows whether it can still be used.
Log Types
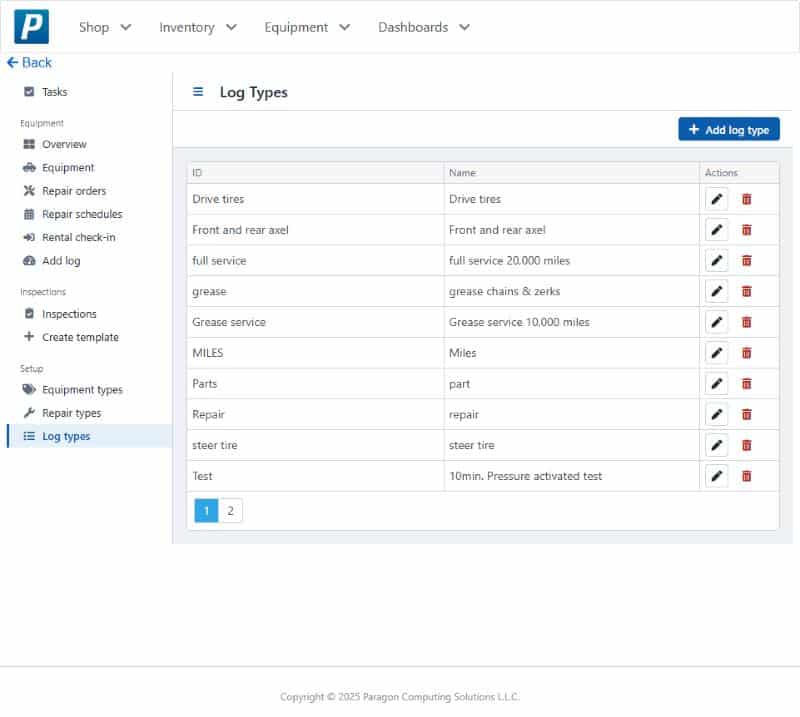
This is a list of log types, which are used when creating logs for equipment. Log types are the kinds of reading or event that can be logged, such as MILES, Grease service or Repair.
What the Status Words Mean
Every status is a word on a colored background, in the same place on every screen.
| Word | Color | Meaning |
|---|---|---|
| Open / To do | Grey | Not done yet and not late |
| Overdue | Red | Not done and past its due date (before today) |
| Completed / Done | Green | Finished |
| Unassigned | Amber | No user has been assigned yet |
| In progress | Amber | An inspection that has started but is not completed |
| Defects | Red | At least one inspection check failed |
| Discontinued | Amber | Equipment or a repair type that is no longer used |
| Active / Inactive | Green / Grey | Whether a template, schedule or type can be used |
| Incomplete | Amber | A repair schedule missing something it needs |
Tip: A repair order due today is still Open and becomes Overdue tomorrow. Every screen uses the same rule.
Keyboard Use and Confirmation Dialogs
- A dialog takes the keyboard focus when it opens. Enter presses its blue button and Esc closes it, as does the ✕ in its corner.
- Where a dialog could lose work or change something important, the safe choice is the blue button (for example Keep equipment or Keep repair order), so pressing Enter by mistake changes nothing.
- Tab moves between fields and buttons, and the focused one has a blue outline. Every list has a link in each row that can be reached with Tab and opened with Enter.
- Messages appear beside the field they are about, and in a summary at the top when saving.
Troubleshooting Messages and Missing Items
| Problem | What to do |
|---|---|
| “Log in to use equipment and maintenance.” | Click Log in and sign in with the portal user name and password. |
| Portal login is not linked to a Paradigm user | Ask an administrator to link the portal login to the Paradigm user. |
| A repair order or piece of equipment is missing from a list | Check the Warehouse box at the top right (choose [ALL] to see everything), the Date range, and Show completed or Show discontinued. |
| “This task requires … Complete it from its repair order.” | Open the task’s repair order and complete its inspection there. The task is completed with it. |
| “This task can’t be reopened …” | Its repair order’s inspection is already completed, so the task stays done. |
| Next is greyed out in an inspection | Answer every check in the group. The line beside the button says what is missing. |
| Check in is greyed out | Answer every required (*) check-in question. |
| A repair order cannot be deleted | A repair schedule created it. Delete that repair schedule first. |
| Start is greyed out for a template | The template is inactive. An administrator can check Active on the template. |
| Create template is not in the menu | Only administrators can design inspection templates. |