Inventory Import & Export
This FAQ will go over how to use the inventory import and export features in Paradigm.
Import / Export Permission

The “Inventory Bulk Import/Export” permission is required for this.
Export

Before exporting inventory items, use the advanced filtering, the column filters, or the search tools to reduce the number of items to be exported until the list is only the inventory items that are needed. Then click the “Export Filtered” button at the bottom.
Select the Type of Data
Choose the type of data to be exported. Each of these tables contain different types of inventory data; more information on each one can be found here: Inventory By Warehouse, Assembly, Unit Measure, Price Levels, Special Prices, Production, Production Default, Alias, Substitution, Inventory Vendor, Inventory Attributes, Inventory Groups, Item Images.

Select the Fields
Then select the fields to be exported. If only the selected fields are showing, uncheck the “Only Show Selected” box.

Field Names and Note
The first column shows the Field Names that are available, based on the type of inventory data that was selected for export. The second column shows a Note that indicates which columns are editable, and can be set through the import process, and which columns are “Export Only,” and are not allowed to have their values set through the import process.

Save as Defaults
To save the selected fields as defaults, click the “Save as Defaults” button. If this is done, the next time items are exported the default fields will already be selected. Clicking “Select Defaults” will reset which Field Names are checked back to the last saved defaults.
Additional Filters
Additional filters can be used to further refine the list of exported items. Here is how they can be used:
- Selecting the add filter button will display a table where additional filters can be added.
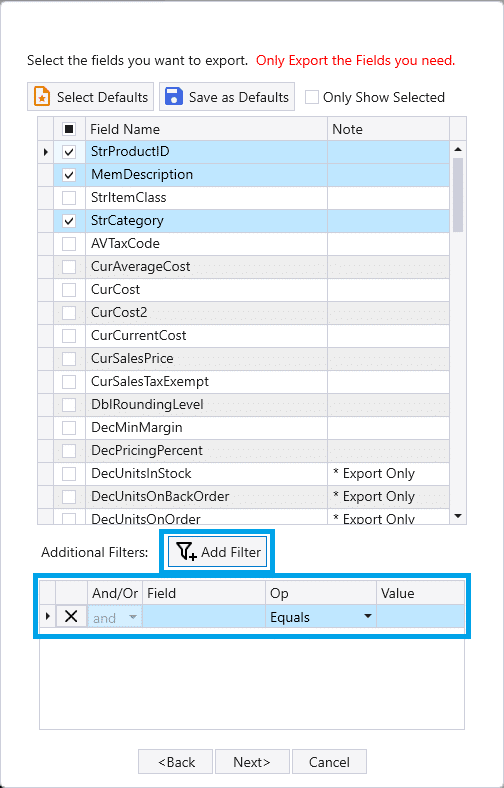
- Then select the field used to filter the items.
- After a field is selected an operator and value must be chosen.
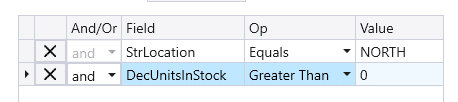
Examples
- Some examples of potentially useful filters are shown below:


- There are over 30 fields that can be used to filter Inventory items. There are many other uses for these filters than shown.
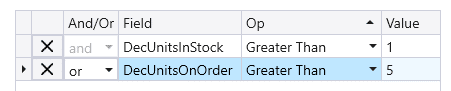
Multiple Filters Examples
- Multiple filters can also be used at the same time. When there is more than one filter, the “And/Or” field can be edited. This allows for many combinations of filters to be used.
- This is not an exhaustive list but here are some simple examples using multiple filters are shown below:
- If there are not any items that meet all the required filters, and the export is completed this message will be displayed:

Complete the Export
After that choose the export format, name the file, and select where it should be exported to.

Import
Create a Spreadsheet
To import inventory data into Paradigm, first use a spreadsheet program such as Microsoft Excel to create a file. The file must be able to be saved with one of the following extensions: .xls , .xlsx , or .csv .
Set the Column Headers
To import data into Paradigm, correct column names must be used; a list of those can be found in the article on Column Names For Inventory. As mentioned in the Export section, some fields can export data out of the program, but are not allowed to import data into the program. These fields are noted in the Export tool with the text “Export Only.”
Column names should be listed out in the top row with the data in the rows following it. Columns that have blank headers will be skipped. If any product IDs on the sheet match product IDs in Paradigm, the data from the sheet will be used to update the information in Paradigm.
Updates can also be made based on just the vendor number (strVendorNumber), as long as the vendor ID (strVendorID) is included in the import as well. If two product IDs have the same vendor number, importing will apply all changes to both items.

Importing New Items
Choose a Template Item
When importing new items, be sure to set up a template item in Paradigm. Information from the template item will be used if it is not specified in the import file.
Import the File
After the file is ready and the template item is set up, go to System > Inventory Import or select the “Import” button from the inventory list.


Then choose the data type being imported.

After that choose the file, select “Add new Inventory Items only” or “Update Existing Inventory and add New Items.” if items are being updated and added, and select the template item.

Update Existing Items
When updating data on existing items, only include the columns that are getting changed.
After the file is ready, go to System > Inventory Import or select the “Import” button from the inventory list.

Then choose the data type being imported.

After that, choose the file, select “Update existing Inventory only”.

Errors
If any errors occur during the import, an excel file will be created with error messages for the items that didn’t imported correctly.
