- Home
- Inventory and Pricing
- How To Do A Physical Inventory
How To Do A Physical Inventory
The purpose of the Physical Inventory feature is to reconcile the actual inventory with the reported inventory in Paradigm. Different companies will do physical inventories on different schedules, but an annual inventory is common.
Physical Count Summary
This physical inventory consists of a few basic steps:
- Make sure all transactions for the counted products are up to date. For example, ensure that all products that have been received are marked as received on their purchase invoices, any shipped orders have been invoiced and posted, and any production builds that have been completed are marked as such. If the transactions for the item are not up to date prior to completing the physical count process, the inventory amount will be off after those transactions posted.
- Determine the order in which the inventory will be counted, such as by category or by shelf, and print the physical inventory worksheet(s) for the selected products.
- Count the physical items in stock, then write the actual count on the printed physical count sheet.
- Enter the actual counts into Paradigm. This can be done by importing an Excel sheet or entering them through the physical count worksheet in Paradigm.
The inventory of the product must not change between counting the item and creating the adjustment in Paradigm. For example, if the inventory is counted on the 4th at 2 PM, transactions for that item post at 3 PM, and the adjustment is made at 5 PM, the adjustment will be off by the amount posted at 3 PM. One exception to this rule is transactions posting on a later date than the count was taken – if a good “end of day” inventory is taken on the 4th, transactions posting on the 5th will be accurately factored in by the physical count analysis process. Regardless, completed counts should be entered and analyzed as soon as possible to avoid issues.
If a physical inventory is being done for lot tracked items, check out this FAQ for some differences in the process: Physical Count with Lots
Physical Count Checklist
Before beginning a physical count, be sure to go through the steps in this list:
- Post invoices that have been shipped or picked up.
- Receive vouchers that have been received.
- Complete production builds that have been manufactured.
- Make arrangements to get the counts entered and analyzed as soon as reasonably possible.
- Decide whether the “Add Current Units Pulled To Worksheet Quantities” option will be used when analyzing the worksheet.
- If that option will not be used, add the pulled units into the physical count.
Create
Physical count worksheets are the basis for the inventory adjustments that will be created. Worksheets from a given date will be aggregated to produce the actual physical inventory of a product, and the system inventory will be adjusted to match. Note that a product that is on two physical count sheets on the same day, the counts from both sheets will be added together to produce the actual quantity in stock.
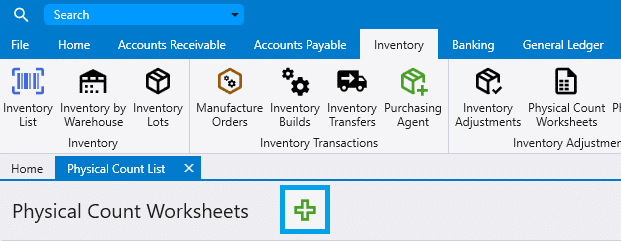
- Go to Inventory > Physical Count Worksheets and create a new worksheet.
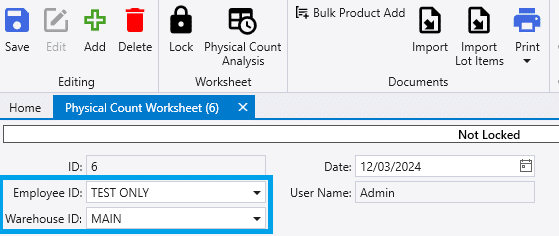
- Then choose the employee ID and warehouse ID.
- Next add the products to be counted. This can be done by entering the items manually, importing them from an excel sheet, or using the bulk add feature.
- Information on how to import using an excel sheet can be found here: Excel Imports On Physical Count Worksheets
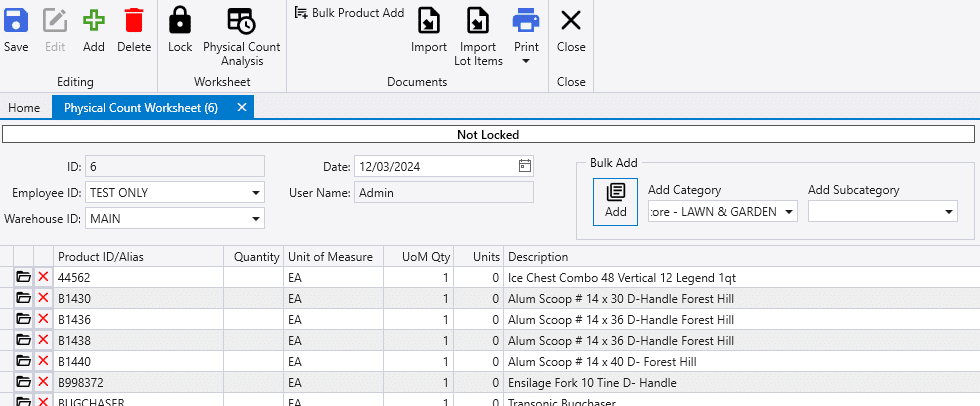
- The print format is shown below.

- The reported physical count needs to include the units received as well as the units committed. If units have been pulled from the shelf and are staged, ready for delivery, those units must still be included in the physical count. If you are utilizing Fulfillment Pro, a units pulled number can be added to the report to help make identifying this quantity easier.
Lock The Worksheet
- Once the products have all been counted, reference the “Physical Inventory Count” report to find the actual count in hand writing and enter it on the sheet. Take careful note of the Unit of Measure field to make sure that the correct units are being counted.
- After all of the product counts have been entered, lock the worksheet and click “Confirm”.
- Locking the worksheet tells Paradigm that the physical count worksheet is finalized, and ready to be used as the basis for an inventory adjustment.


- After the worksheet is locked a large red locked status will appear in the top of the screen.
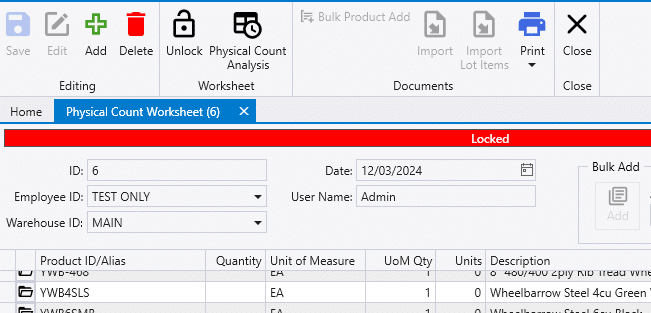
- A worksheet can be unlocked after it has been locked, but inventory adjustments created from the worksheet must be deleted.
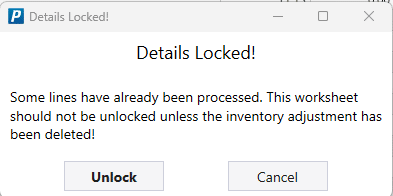
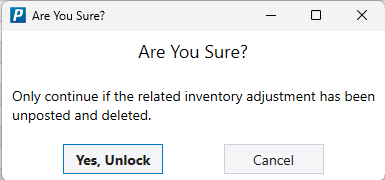
- If lines have been processed on a physical count analysis, the following messages will be shown when unlocking the sheet:
- Details Locked! – Some lines have already been processed. This worksheet should not be unlocked unless the inventory adjustment has been deleted.
- Are You Sure? – Only continue if the related inventory adjustment has been unposted and deleted.
- If lines have been processed on a physical count analysis, the following messages will be shown when unlocking the sheet:
Physical Count Analysis
Physical count analysis takes the finalized Physical Count Worksheets and produces inventory adjustments to actually affect inventory. As well as totaling all worksheets from the selected date, it also factors in the units received and the inventory transactions that occurred after the physical count worksheet date to ensure the correct quantity is entered on the adjustment.
If 10 units are entered on the worksheet, and the product has 4 units received, analysis will set the current “In Stock” total to 6, so that when the purchase for the 4 units is posted, the total stock is 10. (Warehouse Quantities)
If 10 units are on a worksheet dated the 1st, 4 units were sold on the 2nd, and the analysis is being run on the 3rd, then the analysis process will set the “In Stock” total to 6 instead of the counted 10, to match what is currently on the shelf as of the 3rd.
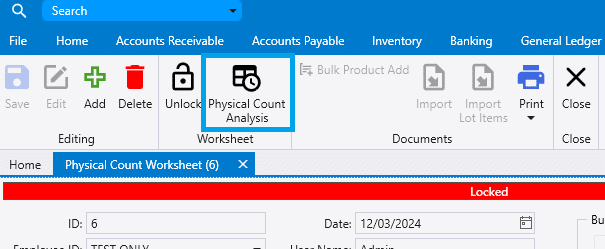
- After completing the physical count worksheet(s) and locking them, the next step is to perform a “Physical Count Analysis”, which can be done by going to Inventory > Physical Count Analysis or by clicking the button from the worksheet.

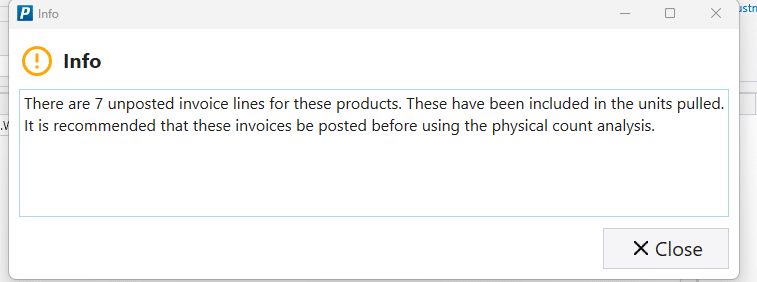
- If there are unposted invoice lines, the following message will be shown: There are X unposted invoice lines for these products. These have been included in the units pulled. It is recommended that these invoices be posted before using the physical count analysis.
- Choose the date of the worksheet to analyze and then click calculate. All locked physical count worksheets from the selected date will be aggregated and used to create adjustment quantities.

- Only Adjust Counted Lots
- If checked, when adjusting lot-based products, only the lots included in the worksheets will be adjusted. Any lot not included in a worksheet will keep its current stock quantities.
- If un-checked, all lots for the selected products will be adjusted to zero if they are not included in the worksheet.
- Count Unposted Build Lots as Sold
- If checked, when adjusting lot-based products, any lot assignments on un-posted builds will get added into the adjusted quantity to prevent the stock from being subtracted twice.
- If un-checked, lot assignments on un-posted builds will be ignored, so the worksheets must include those in their count to get the correct number. (Or the count must be done when there is no production in progress.)
- Add Current Units Pulled To Worksheet Quantities
- Checking this box will include units pulled in the stock calculation on the analysis. This can be used so that the inventory count is accurate, even after invoices are posted.
- If there are 10 units in stock, with 7 units counted and 3 units pulled, selecting this option will adjust the total back to 10 units.
- If this is not checked and the pulled number is not figured into the physical count of 7 units, posting the invoice would cause the 3 units to be taken out of stock, leaving the total at 4 units.
- This will only work if the units pulled has not changed since the count was made.
- To account for this if the units pulled have changed since it was last made, the amount pulled will need to manually be added into the number on the physical count sheet.
- Checking this box will include units pulled in the stock calculation on the analysis. This can be used so that the inventory count is accurate, even after invoices are posted.
- Select the option called “Items with Worksheet Qtys” or “Items Without Worksheet Qtys” and then optionally filter the data by Vendor ID, Warehouse ID, Category, and/or Sub-Category. “Items with Worksheet Qtys” will be used most of the time, the only time that “Items Without Worksheet Qtys” is used is for an end of year inventory count. It can be used to find items that have a quantity in Paradigm, but weren’t counted on the sheet.

- Then click the green plus button beside “Adjustment ID” to create a new adjustment on the right side of the screen, or select an existing unposted adjustment from the dropdown.

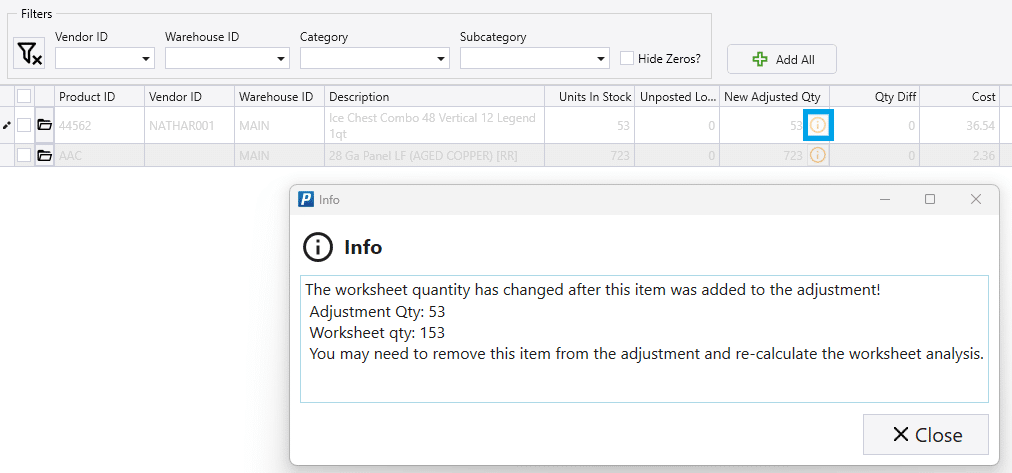
- If an item was added to an adjustment via the physical count analysis and then another worksheet was created for that item for that same date, it will now show the following note beside that line in the analysis: The worksheet quantity has changed after this item was added to the adjustment! Adjustment Qty: X Worksheet Qty: X You may need to remove this item from the adjustment and re-calculate the worksheet analysis.
Adding Items to the Adjustment
The next step is to add the results of the Physical Inventory Count Analysis to the adjustment. Verify the listed “New Adjusted Qty” values are reasonable, then click “Add All” to add all the items on the list to the selected inventory adjustment. Alternatively, select the checkbox beside individual items to add the adjustment and click “Add Selected”.


- After the “Add” button is pushed, the record is transferred to the adjustment on the right side of the screen.

- To remove a record from the adjustment, click the “X” on the left column or click the “Remove All” button to remove all the items. The record(s) will then be returned to the left side of the screen.

- After adding the lines to the adjustment, the physical count analysis screen can safely be closed, without losing your progress.
Post the Adjustment
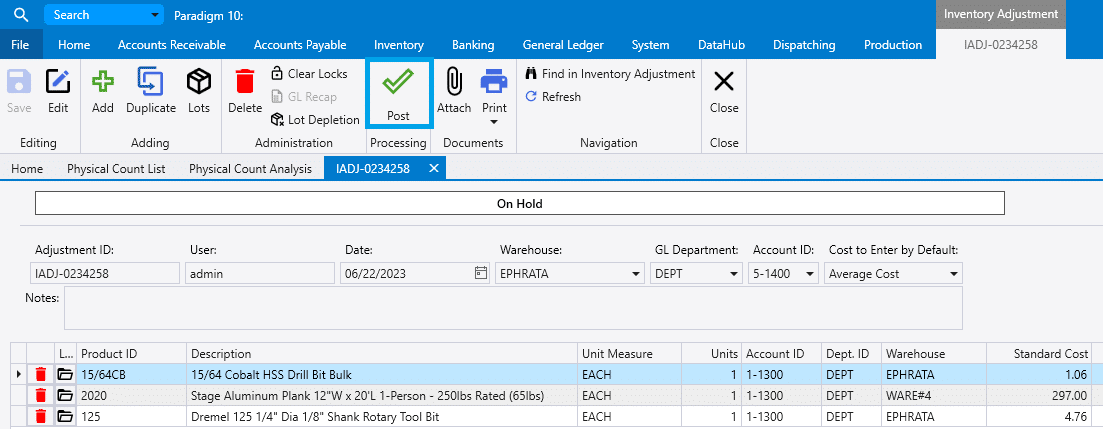
- The next step is to “Post” the adjustment, which can be done by clicking on the “Adjustment ID” link to directly open the adjustment, or by finding the adjustment ID from the Inventory Adjustments list.
- Review the adjustment for accuracy, especially watching out for $0 costs and inventory counts that are exceptionally high.
- Finally, Post the adjustment.
Contents
Categories
- Purchase Order and Vendors (19)
- Production (34)
- Order Entry and Customers (75)
- NEW! (6)
- Job Costing (16)
- Inventory and Pricing (92)
- General (54)
- Fulfillment Pro (29)
- Dispatching (23)
- Administration and Setup (39)
- Add-Ons and Integrations (29)
- Accounting (51)
