- Home
- Inventory and Pricing
- Inventory Transfers
Inventory Transfers
How can I move stock from one of my warehouses to another without creating an invoice for it? How can I do an inter-store transfer?
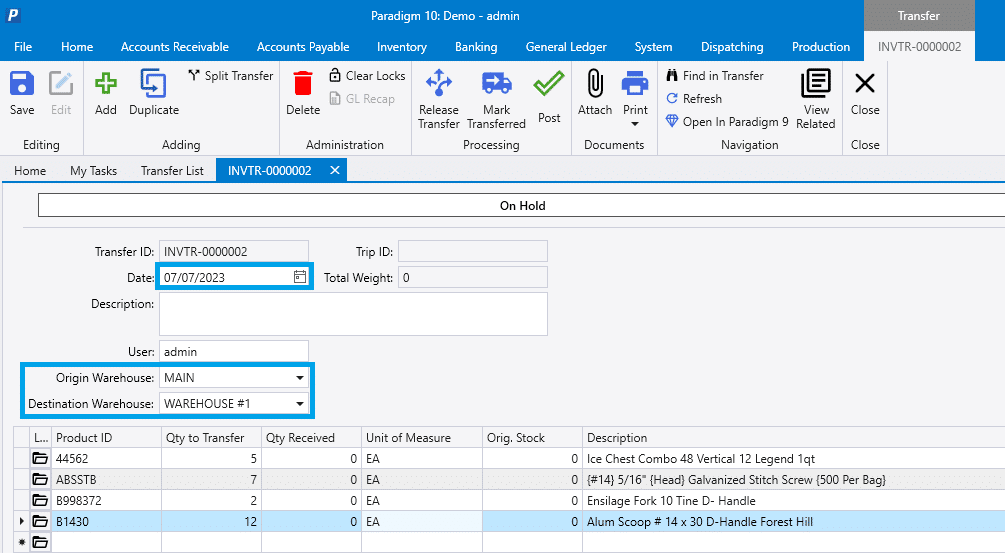
Use the inventory transfer screen to move product from one warehouse to another. First open Inventory -> Inventory Transfers and click the green plus button.

Specify the date to transfer the product, the description of the transfer (if needed) and the origin and destination warehouses. Enter the products to be transferred as well as specifying a ‘Qty to Transfer’, being sure to have the correct unit of measure selected.

When all products to be transferred have been entered, click ‘Release Transfer’, which will mark that stock as committed at the origin warehouse and on PO at the destination warehouse. More info on inventory quantities can be found here: Inventory Count Columns

If your company uses the Dispatching module for Paradigm, the transfer will show up in the ‘Transfers’ section which can be found by going to Dispatching > Transfers. This list will show transfers from the last 365 days. To view the transfer on the list, set the ‘Ship From’ and ‘Ship To’ warehouses to the same as on the transfer.

When the transfer has been assigned to a trip, the trip ID will show on that transfer in Paradigm, and then when the transfer is completed in Dispatching, it will be marked as such in Paradigm. At this point the transfer is ready to post, after entering the actual quantities received for each of the detail lines. Note that a transfer can be posted even if it has not been scheduled or completed in Dispatching. If fewer of a product have been received than were scheduled to transfer, posting the transfer will prompt to add the remaining product to a new transfer.
Highlighted Transfer Dates
Transfer dates get highlighted when they are not optimal.
- Red – This means that the only available transfer date will take place after the requested ship date.
- Orange – This means that the transfer date will take place on the same day as the requested ship date and will not have a long enough lead time.
- Yellow – This means that the transfer date will take place before the ship date, but will not have a long enough lead time.
Creating a Transfer from a Manufacture Order
Transfers can also be created from Manufacture Orders with one click if the items are being produced at a different warehouse than where they will be stocked (in other words, if the header warehouse is different from the detail warehouse). Like in the example below, the “AAG” will get produced at “WARE#4” and then will get shipped to “EPHRATA”.

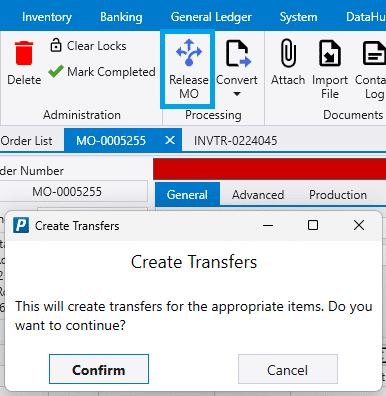
After that, select “Release MO” and a “Create Transfers” option will appear.

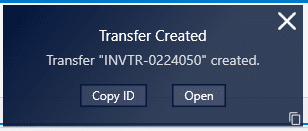
Click confirm, and a transfer will be created and opened.

Converting a Manufacture Order to a Transfer
Another way to create a transfer is by converting a manufacturing order to a transfer. This can be done by clicking the convert button and selecting “Transfer”.

This will create a transfer and include all the items that the warehouse in the header is different than the one in the detail line. In the example below, “ABG” and “AAG” are being produced in “WARE#4” and will then get shipped to “EPHRATA”, so those will be the only ones included in the transfer.

Once the “Transfer” button has been selected, the transfer will be created and can be viewed by clicking the open button on the pop up.

Contents
Categories
- Purchase Order and Vendors (19)
- Production (34)
- Order Entry and Customers (75)
- NEW! (6)
- Job Costing (16)
- Inventory and Pricing (92)
- General (54)
- Fulfillment Pro (29)
- Dispatching (23)
- Administration and Setup (39)
- Add-Ons and Integrations (29)
- Accounting (51)
