- Home
- Inventory and Pricing
- Item Classes
Item Classes
What Is An Item Class?
Item classes are used to quickly and easily assign default values to inventory items. Classes assign defaults to three things: posting accounts, whether or not the item tracks stock, and the custom tax settings.
Item Classes are also a summary of several different G/L Account codes. They contain the Inventory, Cost of Goods Sold (COGS), and Sales accounts for that class whether it be Stock or Non-Stock. Each inventory item in Paradigm has these same attributes, and will inherit its default values from the class to which it is assigned.
Put another way, the item classes essentially control how the inventory, COGS, and sales amounts for items sold or purchased appear on your GL and financials. How detailed or summarized this data is comes down to your preferences. Keep in mind that the classes simply affect the way the amounts appear on your financial report (Balance Sheet, Profit and Loss, etc) and there are different ways to get into more detail when reporting on item sales/costs.
The way the classes are broken down should have actionable value at a glance. If there are too few accounts and it’s too broad or if there are too many accounts and you get lost in the details, it isn’t helpful either way. A common structure we see contains the following basic classes:
| Class | Inventory Account | Sales Account | COGS Account |
| Coils | Coil Inventory | Metal Sales | Metal COGS |
| Manufactured Metal | Finished Goods | Metal Sales | Metal COGS |
| Resale | Resale Inventory | Resale Sales | Resale COGS |
| Special Order | Resale Inventory | Special Order Sales | Special Order COGS |
| OTHER | [CUSTOM] | [CUSTOM] | [CUSTOM] |
Some of the non-stock expense items like packaging materials, truck maintenance, utilities, etc. can be assigned to a “Custom” or “Other” Item Class. For example, you could have an Inventory item called “SHRINKWRAP” that would be in the “Other” class, with its COGS account set to the “Packaging Materials” G/L Code. In other words, we don’t need one class per account an item could possibly post to – we can handle one-offs individually at the item level. Classes are most useful for larger sets of items that have a large impact on your financials.
How to Create a New Item Class
- First, go to Inventory and select the item for which to create a new item class.
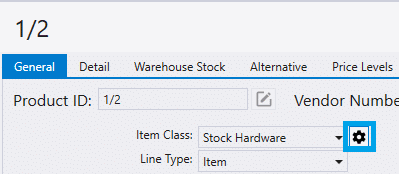
- Then from the General tab, select the gear icon beside “Item Class”.

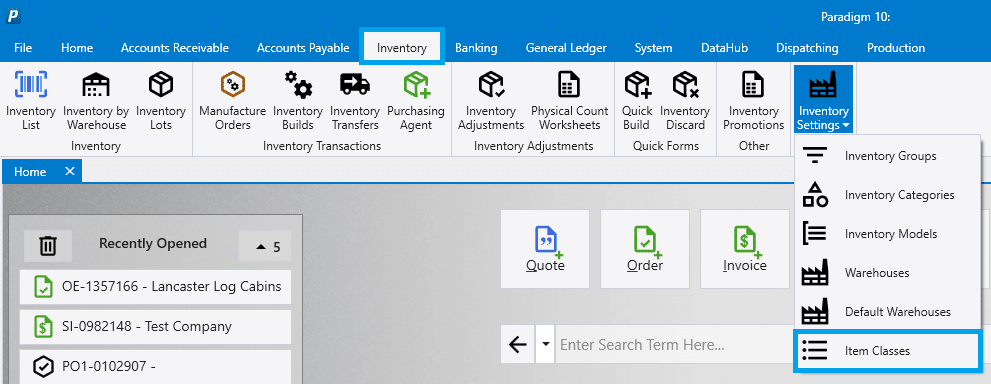
- Alternatively, go to Inventory > Inventory Settings drop down > Item Classes

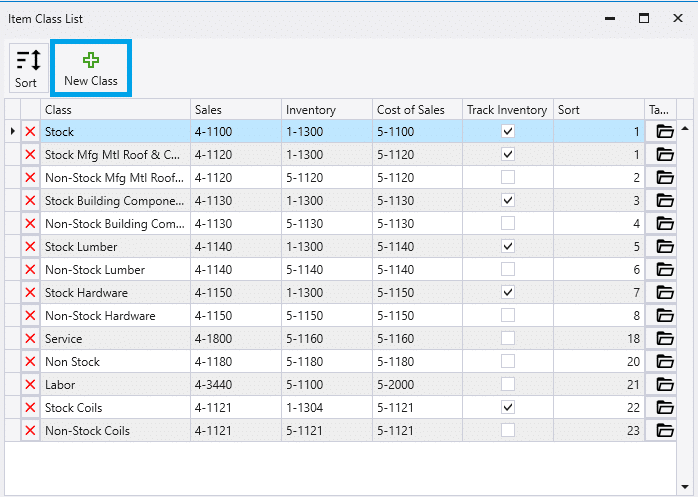
- Then select the New Class button from the pop up, or click the folder icon to edit tax settings for an item class. To delete an item class, click the red “X”. Note that an item class cannot be delete if it has been assigned to an item.

- Then enter the new item class’s name, and a template item class from which to copy the settings.

- The new class will copy the posting account, whether or not to track stock, and the custom tax settings from the template class.
- If a class is non-stock, be sure the inventory and COGS account get set to the same COGS account.
Contents
Categories
- Purchase Order and Vendors (19)
- Production (34)
- Order Entry and Customers (75)
- NEW! (6)
- Job Costing (16)
- Inventory and Pricing (92)
- General (54)
- Fulfillment Pro (29)
- Dispatching (23)
- Administration and Setup (39)
- Add-Ons and Integrations (29)
- Accounting (51)
