- Home
- Fulfillment Pro
- Fulfillment Pro: Employee Filters and Settings
Fulfillment Pro: Employee Filters and Settings
This FAQ will go over how to create and edit Fulfillment settings for an employee. Information on how to create a new employee web login can be found here: Create Employee Web Logins
To start go to System > Company Preferences > Employee Web Accounts

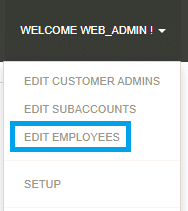
Log in with the administrator account (usually “web_admin“), click the dropdown in the top right corner, and select “Edit Employees.”
Then click on the “Details” button.

Click on the “Fulfillment Settings” to view or change the configuration settings for this user in Fulfillment. Each option has hover-text that explains its function.
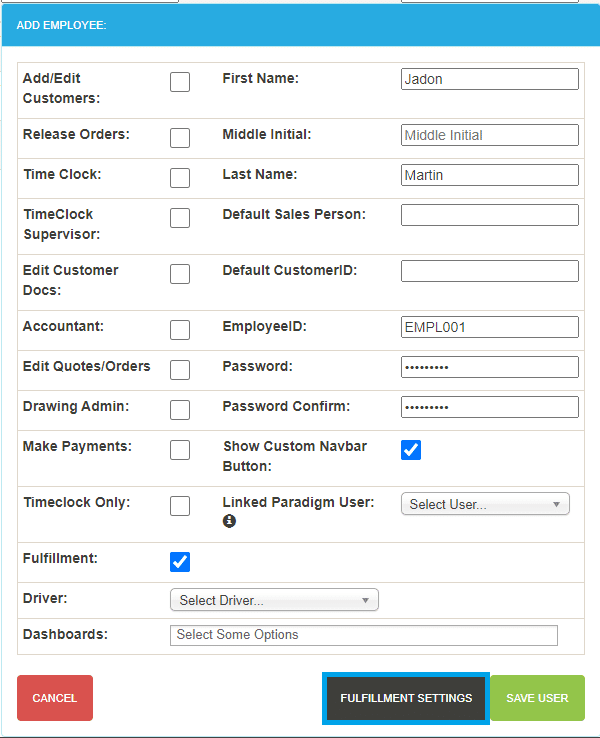
Fulfillment Settings
Order Labels
The dropdown lists of report options for the single and multi-item labels include several standard sizes, but custom sizes can be created if needed.

Account Setup
The settings here control what the user can access in Fulfillment.
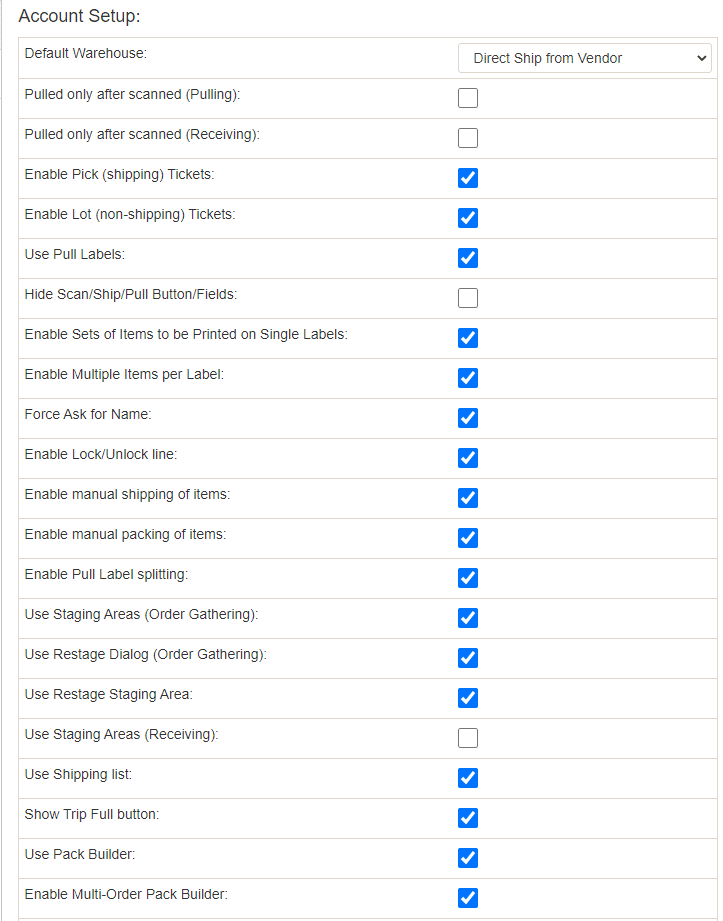
- Default Warehouse – If a user doesn’t select a warehouse, this warehouse will be used. More info on how to select a warehouse can be found here: Fulfillment Pro: Browser Settings
- Pulled only after scanned (Pulling) – If this is checked, items will not be marked pulled until they are scanned. If unchecked, the label will be marked pulled when it is created. More info on pulling can be found here: Fulfillment Pro: Pulling (Picking)
- Pulled only after scanned (Receiving) – If this is checked, items will not be marked pulled until they are scanned. If unchecked, the label will be marked pulled when it is created. More info on receiving can be found here: Fulfillment: Receiving
- Enable Pick (shipping) Tickets – Allow the user to print a pick ticket for the selected locations. The items on the ticket will be marked as pulled. More info on picking can be found here: Fulfillment Pro: Pulling (Picking)
- Enable Lot (non-shipping) Tickets – Allow the user to print a ticket for items in the selected locations. This will not affect the pull status of any of the items.
- Use Pull Labels – This allows the user to choose which lines they want to print, and which lines they don’t. It also allows them to print part of a line.
- There are two different types of pull labels.
- Single item labels only have one item on them. Depending on the label that is chosen, it includes product ID, pieces, bundle ID, and description.
- Multiple item labels have more than one item on them. Depending on what label that is chosen, it will include a list of products with the product ID, pieces, bundle ID, and description.
- More info on pull labels can be found here: Fulfillment Pro: Pulling (Picking)
- There are two different types of pull labels.
- Hide Scan/Ship/Pull Button/Fields – Hides the scan button. Use this option if pulling labels when printed, and they aren’t being marked as shipped.
- Enable Sets of Items to be Printed on Single Labels – Allow a user to print a selected group of items on individual labels.
- Enable Multiple Items Per Label – Allow user to print multiple items on single label.
- Force Ask for Name – Force user to choose employee name when printing pick tickets or scanning something as shipped or pulled. Otherwise, uses first and last name for user login. Do note that the user will only be asked for name when printing pull label if the label is being marked as pulled.
- Enable Lock/Unlock Line – Allow user to lock and unlock single lines. No printing is necessary to lock lines. All pull labels will lose their reference to a line that is unlocked. This means that single labels will be invalid; however, multiple labels will only lose their reference to that line (they will still be valid for other lines).
- Enable Manual Shipping of Items – Allow user to manually ship a product from the shipping list without scanning a label. More info on shipping can be found here: Fulfillment Pro: Shipping
- Enable Manual Packing of Items – Allow user to manually pack a product from the packing list without scanning a label. More info on packing can be found here: Fulfillment Pro: Packing
- Enable Pull Label Splitting – This enables a user to remove items from a pull label after it has been created. The quantity can either be put onto a new label (with the same pulling information as the original) or removed and put back in the pull list.
- Use Staging Areas (Order Gathering) – Staging areas allow users to assign a label to a specific location for easier finding when shipping. Does not apply to pull labels made in Receiving. Forces the user to select a staging prior to printing a label for the line. More info on staging can be found here: Fulfillment Pro: Staging Areas
- Use Restage Dialog (Order Gathering) – The restage dialog allows for quick restaging with barcodes. This will show a button at the top of Fulfillment to open the restaging dialog.
- Use Restage Staging Area – This is a tab in the restage dialog – it will allow moving all items from one staging area to another.
- Use Staging Areas (Receiving) – Allows the user to set staging areas for pull labels made in receiving. More info on staging can be found here: Fulfillment Pro: Staging Areas
- Use Shipping List – The shipping list can be used to make sure all of the items in the order are on the truck. More info on shipping can be found here: Fulfillment Pro: Shipping
- Show Trip Full Button – The Trip Full button in the Shipping List allows the user to mark a trip as full, and use a backup trip if available. More info on that feature can be found here: Fulfillment Pro: Trip Is Full
- Use Pack Builder – The pack builder allows pull labels to be assigned to a pack. The label for the pack will mark all items in the pack as shipped when it is shipped. More info on packing can be found here: Fulfillment Pro: Packing
- Enable Multi-Order Pack Builder – Allow packing items from different orders into the same pack (order’s customer, ship to address, and ship date must match).
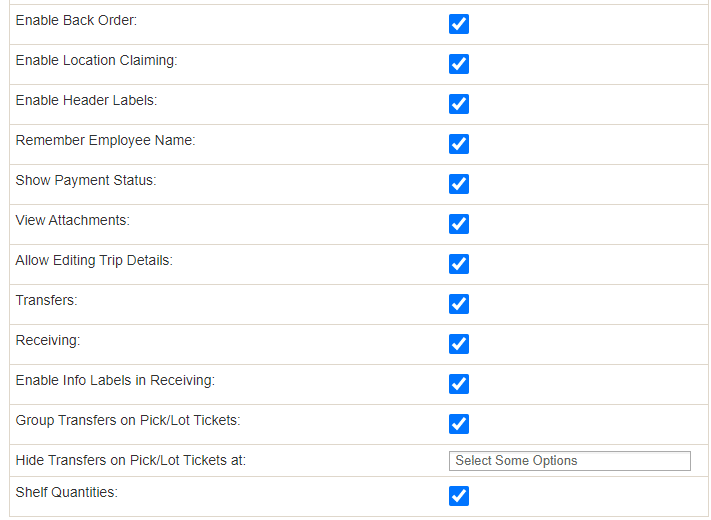
- Enable Back Order – This allows the user to set a quantity to back order. These quantities are back ordered when the order is completed. More info on back ordering can be found here: Fulfillment Pro: Back Ordering
- Enable Location Claiming – Claiming locations lets other users know that someone is gathering items for that location. More info on location claiming can be found here: Fulfillment Pro: Location Claiming
- Enable Header Labels – Allows user to print header labels for order. Header labels include basic order header information, but no items.
- Remember Employee Name – If checked, after a print, or closing a list, the selected employee is saved. If unchecked, after a print, or closing a list, the selected employee is removed.
- Show Payment Status – Shows how much of the order has been paid. Also shows the ID’s of related payment documents. Does not show any dollar amounts.
- View Attachments – Allow user to see files attached to order detail lines. More information on attachments can be found here: File Management & Attachments
- Allow Editing Trip Details – Allow user to change trailer and status on the trip.
- Transfers – Enables transfers. Transfer items will show at warehouse of origin. More information on transfers can be found here: Fulfillment Pro: Transfers
- Receiving – Enables PO Receiving. Allows user to create purchase invoices and receive products. More info on receiving can be found here: Fulfillment: Receiving
- Enable Info Labels in Receiving – Allows the user to print info labels for purchase invoices made in receiving, for items that are not linked to an order.
- Group Transfers on Pick/Lot Tickets – Puts items that are transferred in a separate group in Pick/Lot tickets.
- Hide Transfers on Pick/Lot at – Select a warehouse or warehouses from the drop down. Transfer items are not printed on pick/lot tickets that are printed at these warehouses.
- Shelf Quantities – Shows button to load shelf quantities on pull list and pack builder.
List Filters
The list filters created here can be chosen by the user in the main orders list.
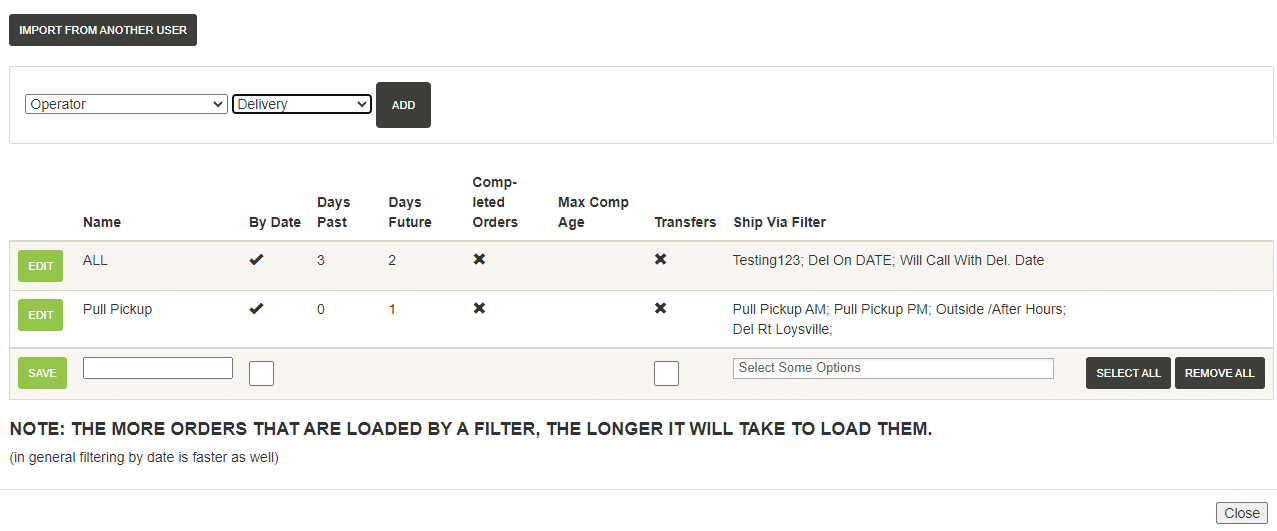
Adding A Filter From Another User
To add a filter from another user, click “Import From Another User”, select the user and the filter from the drop downs, and click “Add”.

Creating New Filters
To create a new filter, enter the name and select whether or not it is controlled by the date. If the filter does not have the “By Date” option checked, the filter will include all orders that fit the rest of the criteria, regardless of the ship date on the order.
Then select the days past and future, whether or not to include completed orders and the max age of the completed orders, and whether or not to include transfers. If “Completed Orders” is checked, orders will show up until they are completely shipped in Fulfillment or past the max completion age. If unchecked, orders will appear until they are marked completed; typically by converting it to an invoice in Paradigm.
Select the ship vias from the drop down that are to be shown with this filter, or click “Select All”. Once all the information is entered, click save.

Contents
Categories
- Purchase Order and Vendors (19)
- Production (34)
- Order Entry and Customers (75)
- NEW! (6)
- Job Costing (16)
- Inventory and Pricing (92)
- General (54)
- Fulfillment Pro (29)
- Dispatching (23)
- Administration and Setup (39)
- Add-Ons and Integrations (29)
- Accounting (51)
