- Home
- Inventory and Pricing
- How to Create an Inventory Item
How to Create an Inventory Item
When creating an inventory item it is recommended to find a similar existing inventory item and duplicate it. Follow to steps below to learn how to do that, or how to create an item from scratch.
Check out these FAQs for specific instructions on the following cases for adding items: Adding A New Line Of Colors, Import New Profiles
Creating An Item by Duplicating an Existing One
1. Go to Inventory > Inventory List
2. Then search for the product that is going to get duplicated.
3. Open the item and click the “Duplicate” button in the header.

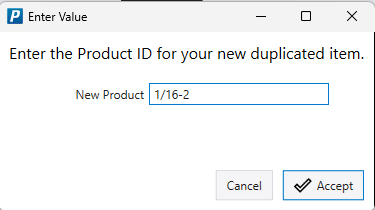
4. Then enter the product ID for the new item. This Product ID will be used throughout Paradigm Accounting to reference this inventory item.

5. Finally, apply any other needed settings or information for the inventory item. Those fields and settings are explained below.
Creating an Inventory Item from Scratch
1. Go to Inventory > Inventory List
2. Then click the green plus icon.

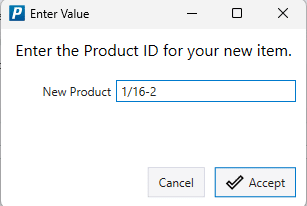
3. Then enter the new product ID. This Product ID will be used throughout Paradigm Accounting to reference this inventory item.

4. Finally, apply any other needed settings or information for the inventory item. Those fields and settings are explained below.
Inventory Item Options/Settings
The Stocked Inventory check box in the “Detail” tab will keep track of the units in stock every time the selected item is bought or sold.

The Vendor Number field is used to enter your vendor’s part number of the inventory item. This will be the number that prints for the vendor ID or the default vendor. This way you can use your Product ID number to create a Vendor Purchase Order but when you print that purchase order it will use the part number that the Vendor will recognize.

The Vendor ID drop down field is used to assign a vendor to the inventory item. You can select any vendor that has been previously entered by starting to type the Vendor ID or click on the drop down arrow to search vendors.
The Vendor Site drop down is used to assign one of the selected vendor’s sites to the item. These must be set up in the Vendor before they can be added to an item.

The Item Class drop down is an important field that must be assigned properly. This field tells Paradigm Accounting how to update your General Ledger. If you click on the gear beside the item class drop down, it will display the list of item classes and their settings. When you select an item class from the drop down box you will notice that the GL Accounts Impacted area will automatically fill in the Account IDs used to update your general ledger. The Item Class you select will also set the Track Stock status on the detail page. Learn more about item classes here: Item Classes
The Category drop down is used to assign a category to each inventory item. This can be helpful if you want to group certain inventory items with others. Click on the gear icon beside Category: to open the window where you can add, delete or modify inventory categories.
The Sub-Category can be changed by clicking on the sub-category drop down. Click on the gear icon beside sub-category: to open the window where you can add, delete or modify inventory sub-categories.
The Manufacturer drop down is used to enter the manufacturer of the inventory item.
The Sales Description field is used to enter a detailed description of the inventory item. The description field is a memo field, which is capable of storing up to 64,000 characters of text.
The Purchase Description field is the description that will show up on purchase transactions. If this field is left blank, the Sales Description will be used.
The Additional Info field is used to enter an additional description of up to 50 characters. This is typically used for internal information or just to enter short notes about the main description.
The Color Set field can be used to assign a particular set of color options to this item. These colors will be available when adding this item to an order. Click the gear icon beside the color set drop down to open a color set builder and make new color sets or edit existing ones.
The Color field can be used to assign one particular color to this product. Click the gear icon beside the color drop down to open a list of colors and add new ones.
The GL Accounts Impacted area will display the three Account IDs that are automatically filled in when you select an Item Class. You can override any of these accounts and change them to any other valid GL Account. If the item is nonstock, the inventory account will not be shown.

The Standard Cost field is the cost you assign as the inventory items standard cost. This cost is used by default when adding the product to most transactions. It is also the cost the Pricing Method field will use to calculate the Sales Price if you enable it.
The Standard Cost 2 is an additional, optional cost column that can be used for more detailed pricing structures. It often is used to contain the “replacement cost” or “bulk cost” of the item.

The Current Cost field is used to track the items actual cost you paid for it. The Current Cost will get updated automatically every time you create and post a Purchase Invoice that uses this inventory item. This will always let you know what your latest cost is for this inventory item. Since this field constantly changes when you create Purchase Invoices the Standard Cost is provided to hold a constant cost that only changes when you change it. The Current Cost field will be locked after you are finished entering a new inventory item.
The Pricing Method drop down can be used to assign one of four different pricing methods to the inventory items Standard Cost field. This can be very helpful if you are looking to add a set amount to the cost of your inventory items. You can choose from Fixed Dollar Amount, Markup Standard Cost, Markup Standard Cost 2, Percent of Margin, Percent of Margin Cost2, or None. When you first create a new inventory item the Pricing Method field will be set to None. This can be changed at any time to a different Pricing Method.
The Discount Sensitivity Code can be used to specify the maximum customer discount that is allowed to be applied to this item. Click the gear icon to set up new sensitivity codes.
The Rounding Precision is used to specify the rounding that is used for this item. Paradigm always rounds up to the next increment when calculating the price. For example, if the rounding level was 0.50, a calculated price of 2.01 would be rounded up to 2.50.
The Sales Unit Measure is the unit of measure that will be used by default on sales transactions. Click the gear icon to add or edit units of measure. More info on units of measure can be found here: Unit of Measure Set Up
The Purchase Unit Measure is the unit of measure that will be used by default on purchase transactions.
A Minimum Margin can be set to give users a prompt if they define a discount or sales price that goes below the minimum discount percentage. See also: Minimum Acceptable Margin
Contents
Categories
- Purchase Order and Vendors (19)
- Production (34)
- Order Entry and Customers (75)
- NEW! (6)
- Job Costing (16)
- Inventory and Pricing (92)
- General (54)
- Fulfillment Pro (29)
- Dispatching (23)
- Administration and Setup (39)
- Add-Ons and Integrations (29)
- Accounting (51)
