- Home
- Add-Ons and Integrations
- Store Management App
Store Management App
This FAQ will go over how to use the store management app. This also includes the shelf label tool: Shelf Label Print Tool
Store Management App
The store management app is mostly geared towards retail hardware stores. It allows for items locations to be set to a specific location within a store or warehouse. This will allow the new employee to find that bucket of roofing cement in 15 minutes, rather than the 35 minutes it would have taken without this information. It also scales well on smaller devices, so it can easily be used on a mobile scanner that an employee can carry with them, such as this one: Zebra TC21/TC26.
- To use the shelf assignment tool, find the shelf assignment tool webpage. It should be saved as a shortcut in the installers folder. It’ll look something like this: http://192.168.123.456:8080/Inventory/Inventory
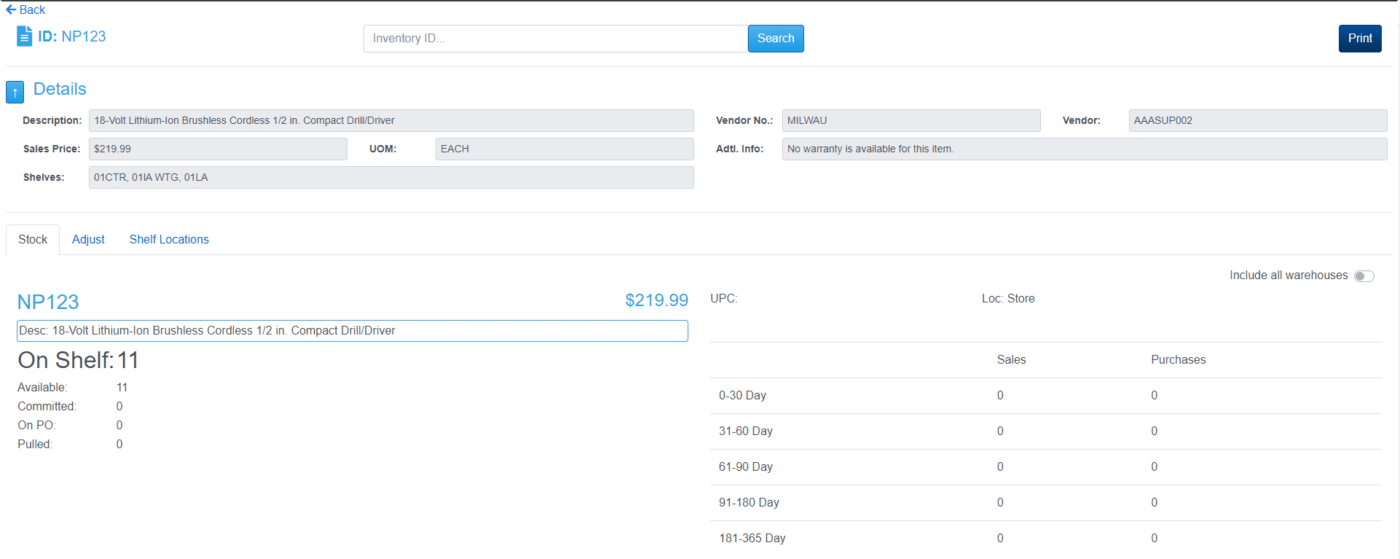
- Once on the webpage, a product ID or an alias can be typed or scanned in. This will bring up all the information for that particular item.

Stock
- This tab shows the on shelf quantity, quantity available, and other info about this item.
- The on shelf quantity is calculated by: Stock + Received – quantity pulled by Fulfillment Pro.

Adjust
- This tab is useful for when the inventory needs to be adjusted.
- A Customer Portal login is required for this tab.

- Adjust Button – Adjust the current stock quantity to the actual quantity.
- Order Button – Create a purchase order or select an existing one. This allows the scanned item to be added to a PO, enabling a PO to be built by walking through the store and scanning items.
Shelf Locations
- This tab will display the shelves that the item is on.
- Sometimes, an item like the one below might have three or more shelves – a primary sales shelf, an endcap, and a backstock shelf etc. The shelf levels can be viewed and set here if the user is signed in.
- Clicking on the shelf number will bring up a list of all the items on that shelf.

Shelf Manager
- If “Shelf Manager” is selected from the section above, it will go to the drop down and search bar to look for products on certain shelves.

- To add an item to a shelf, start by typing/scanning a shelf ID in the search field, or by selecting one from the dropdown.
- Once a shelf is selected, then products can be entered/scanned into the search field to add the item onto the shelf.

- If the button highlighted above is selected, it will bring up the “Clear Shelf” button.

- This will clear all items on the selected shelf.
- This is useful when when verifying if the items on that shelf are accurate or if some reorganizing is being done. Clearing the shelf, then scanning in the shelf ID and then all the items is an easy way to do this.
Barcode Format
- Format for shelf barcodes is a pound sign (#), followed by the ID of the shelf. E.g. “#1234”.
- Shelf IDs can be found by selecting the pencil button beside the shelf dropdown. The pencil will only appear if the user is logged in with a Customer Portal account.

- A barcode can then be printed with this information, to allow scanning that barcode to select the shelf ID.
Viewing Shelf Data in Paradigm
- To view the shelf IDs for an item, go to Inventory > Inventory and open the item.
- Then go to the Detail tab and there it will display a list of Shelf IDs.

Shelf Data in Fulfillment
- If the shelf location is set, it will be shown after the item description in the pull list.

- It will also then appear with the description in the pack builder.

Contents
Categories
- Purchase Order and Vendors (19)
- Production (34)
- Order Entry and Customers (75)
- NEW! (6)
- Job Costing (16)
- Inventory and Pricing (92)
- General (54)
- Fulfillment Pro (29)
- Dispatching (23)
- Administration and Setup (39)
- Add-Ons and Integrations (29)
- Accounting (51)
