Integrated ACH Payments Addon
This FAQ will go over how to set up ACH Payments in Paradigm (also called EFT Payments in Canada). This can be set up for only AR or only AP, or both. This integration does not verify that funds are available or the bank details are correct. The whole process is very similar to a paper check, just done electronically.
This option is dependent on the bank, and if the bank can process a NACHA file. The bank may not accept it at all, may only have a manual upload version, or may have an automated upload option. Talk to the bank and see what options are offered around NACHA files. Once that is complete, contact Paragon to set this up.
For payments from customers, the actual upload to the bank will happen once per day for all of the payments received that day. For payments to vendors, if they are configured for automatic upload, they are sent immediately.
Set Up
Company Preference Set Up
Once ACH file upload credentials and details are received from the bank, go to Company Preferences > Add-Ons > and fill in the file upload credentials and connection details.


- Enable ACH Payments – Contact Paragon to get this enabled.
- Enable Telephone ACH Transactions (TEL) – Enables ACH transactions that can be confirmed by phone.
- Enable In Person Consumer ACH Transactions (PPD) – Enables ACH transactions that can be confirmed in person.
- AR File Action – The bank should supply their preferred upload option. The options are: Upload with Omega, Upload With SFTP, Upload with Web Dav, Manual Download Only.
- AP File Action – The bank should supply their preferred upload option. The options are: Download To Local File, Upload with Omega, Upload With SFTP, Upload with Web Dav.
- If “Download to Local File” is selected for the AP side, it will use the selected file path in User Preferences > Printing/Startup > PDF Defaults > File saving path. If no file path is selected, the user will be prompted to select one on making the payment. This file would then be manually uploaded/sent to the bank for processing.
- Bank-supplied Connection Details – This information will be supplied by the bank.
- Set file upload credentials – Enter the ACH bank username and password.
- If Omega is selected as the upload option, enter the Omega username and password, then enter the rest of the connection details. These should be supplied by the bank.
- AR Payment Deposit Account – Choose the bank account registered with ACH, to receive ACH deposits. This account must have account details entered in Paradigm, see this section: ACH Bank Set Up
- AP Payment Account – Choose the bank account registered with ACH, to make ACH payments. This account must have account details entered in Paradigm, see this section: ACH Bank Set Up
- ACH/EFT Clearing Bank Account – ACH Payments to vendors are recorded in the clearing account and an entry will be auto created to clear this account and record a withdrawal in the bank account for each ACH file uploaded.
- Confirmation Email Template (Optional) – On enabling ACH, an Email Template will be created, if there is not an existing one with the name “ACH Confirmation Email”. This template can be modified as desired, or another one can be selected.
- This is the confirmation emailed to the customer after receiving an ACH payment from them, if “Telephone” is selected in the “Pay With ACH” screen.
- Web ACH Agreement – The web ACH agreement that is shown to the customer.
- Web ACH Details Storage Agreement – The web ACH details storage agreement that is shown to the customer.
Security
Go to System > User Security > enable “ACH Payments” for roles or users that need to view the list of ACH payments.

ACH Bank Set Up
Set up the selected AR Payment Deposit Account and/or the selected AP Payment Account. For the AR side, this will be the bank the funds are going into, and for the AP side this is the account the funds will be pulled from.
This can be added to the checking accounts in Chart of Accounts > Edit GL Account > ACH tab. This information is supplied by the bank. This cannot be set if bank account is set as the ACH clearing account.

- Account Number – Account Number on bank account.
- Routing Number – Bank’s Routing Number.
- EIN Federal Tax ID – Tax ID provided by the bank.
- Balance NACHA File – Some banks require an OFFSET/balance line, to balance to NACHA file.
- e.g. There’s a file with credit detail lines summing up to $100, there will be a balance line created of $100 debit.
- Use today’s date – This is up to the preference of the bank.
- If not enabled, it will automatically set date 2 days in advance.
- Bank Name – Name of bank.
- Company Name – Name on Account.
- Immediate Origin: (iTreasury ACH ID) – 10 digit ID supplied by the bank.
- Immediate Destination – Sets the receiving bank. The Routing Number will be used if left empty.
EFT Payments Set Up
- Complete the steps in the company preference set up, with the exception of having “EFT Payments” enabled instead of “ACH Payments”.
- Enter Transaction Codes/CPA Codes. These codes should be supplied by the bank. (CPA Codes – EFT)

EFT Bank Account Set Up

- Account Number – Account Number on bank account.
- Institution Number – Bank’s Institution/Transaction Number.
- Use today’s date – This is up to the preference of the bank.
- If not enabled, it will automatically set the date 2 days in advance.
- Company Name – Max 15 Characters. This name appears on the EFT file header and some companies require all capitalized.
- Company ID – 10 digit ID supplied by bank.
Vendor Set Up
If ACH payments are enabled, and the selected Preferred Payment Method on the vendor detail tab is ACH, the vendor can be registered for ACH payments. Only one account can be linked per vendor.

The “Account Name” is the general name for the account, usually a vendor name but could be something like “Lumber Company Checking”. The “Account Holder’s Name” is the actual name on the bank account. That may be the vendor name or it could be an individual’s name, depending on the business. The “Account Holder’s Name” will appear on the transaction lines of the NACHA file.

Once the vendor is registered, buttons will be shown to unregister the vendor or to edit the registration.

Usage
ACH Payments To Vendors
ACH payments can be made to the vendor from Pay Bills Multi-Vendor. The total payment amount per vendor needs to be a positive amount.
When paying vendors that are registered for ACH payments from the Pay Bills Multi-Vendor screen, the “ACH/EFT” payment type filter can be used. The default “AR Payment deposit account” from ACH settings will be auto-selected when the user selects “ACH/EFT”.

Once the purchase invoices have been selected, click the “Post and Pay with ACH” button. After posting, a list of the ACH payments will be shown. In most cases, this will save a NACHA file, which then needs to be manually uploaded on the bank’s site. After that the ACH remittance forms can be emailed to the vendors from the payable list screen.

Once the payable is posted, the bank account changes to a clearing account, and a withdrawal is made between clearing and source account. One withdrawal is made per payment batch, with a detail line for each payment that was in the ACH. This is done so that the records in Paradigm match how the funds will be withdrawn from the account.
Vendor Prepayments
ACH payments can also be generated from a vendor prepayment, using the “Create ACH File” button.

ACH Payments From Customers
For most banks, ACH payments can only be processed for business accounts. If the customer does not have a business account, they will be directed to the EBizCharge ACH form.
Saved ACH Accounts
ACH accounts can be added by going to the customer’s detail tab [1]. Any account details that are entered will be securely saved for future use. This cannot be done on the customer saved as the default POS customer: Company Preferences > Add-Ons > Default POS Customer
Set the “Allowed Online Payment Types” as well [2].

Authorization On File
To mark a customer as “Authorization On File”, click the pencil icon to enter the max authorization amount and confirm the authorization on file.

Receive ACH Payments
To receive ACH payments, select the “Pay With ACH” button in the receive payment screen. To edit the charge amount, click “Edit Charge Amount” and then select “Pay with ACH”. ACH payments cannot be received for the customer saved as the default POS customer.

Select or add a bank account, and choose whether the customer is there in person or calling in. Any account details that are entered will be securely saved for future use. An exception to that is the default point of sale customer will not show the ACH registration screen or show the “Pay With ACH” option.
Telephone
If the customer is calling in, select “Telephone” and the message below must be read. After that has been completed, select “Pay With ACH”.
Note that this only works with Personal bank accounts, not Business accounts.

In-Person
If the customer is there in person, select “In-person” and the ACH agreement must be printed, signed, and kept on file. After that has been completed, select “Pay With ACH”.

Online Payments
When a customer is paying through online payments and confirmation or customer portal, they will have the option to choose between ACH or Credit Card when paying if both options are enabled. More information on how to enable online payments can be found here: Online Payments > Customers

Paying via ACH
Once a customer is paying via an ACH, they will be prompted to fill in their bank account information. Once entered it will be saved and can be used on future transactions.


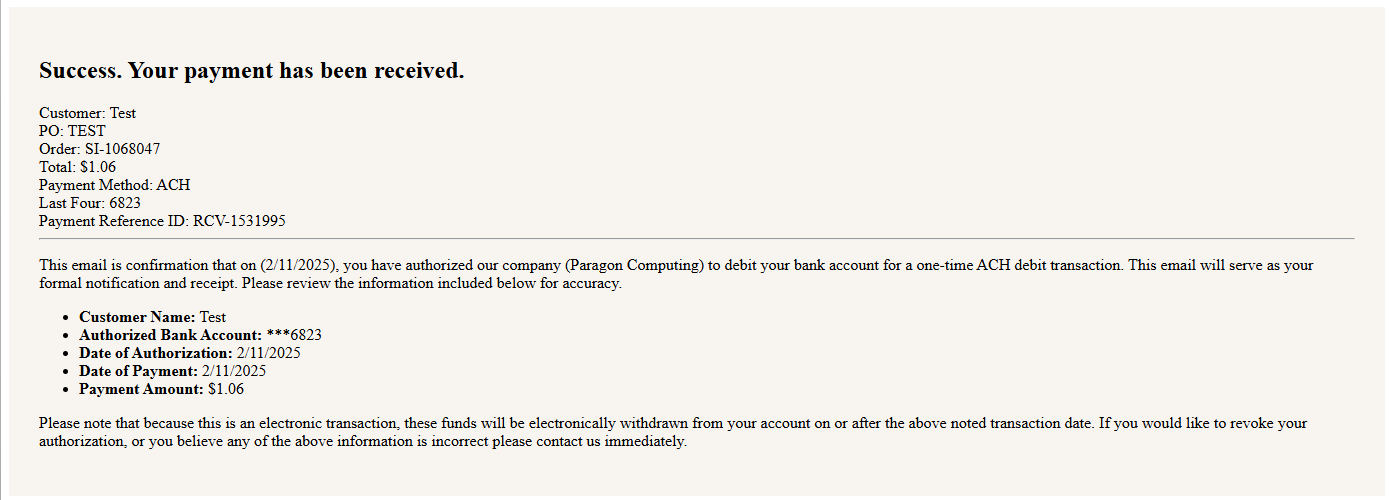
Once the payment is complete, a confirmation email will be sent to the customer. See the example email below:
Batch Emailing
Sending batch emails with online payments and confirmation links is an easy way to send invoices to your customers to have them pay via ACH. See the example email below:

ACH Receivables
After the customer pays via ACH, a receivable will be created with the payment method set to “ACH” and “ACH Processed” shown in the banner after the ACH has been processed.

ACH Receivable Unposting
Unposting the receivable before the ACH has been processed will show the following message: You are about to unpost receivable “RCV-XXXXXXX”. There is an unprocessed ACH Payment for this receivable. Unposting this receivable will delete the ACH payment. Are you sure you want to continue?

Unposting the receivable after the ACH has been processed will show the following message: You are about to unpost receivable “RCV-XXXXXXX”. There is already a processed ACH payment for this receivable. Unposting will not cancel the ACH payment. If this payment is unposted and reprocessed, it will create another ACH payment. Are you sure you want to continue?

ACH Payments List
To view the list of received ACH payments, go to Accounts Receivable > ACH Payments. To view processed payments, check the box highlight below [1]. ACH Files can be downloaded by selecting the payments and then clicking “Download ACH Files” [3]. The date set in the “Payment Date” [2] form will be used as the effective date in the downloaded files. After a file is manually downloaded, it gets marked as sent and will not be automatically uploaded. Once an ACH payment is marked as sent, it cannot be downloaded again. After a payment is uploaded to the bank or downloaded, a deposit will be automatically created to move the funds from out of “Undeposited Funds” to the bank account.
